Introduction
The purpose of this document is to guide you through the different stages of rehabilitation (rehab) following Anterior Cruciate Ligament (ACL) Reconstructive Surgery. You have chosen to undertake your rehabilitation at home under the regular supervision from a physiotherapist. This is instead of attending the physiotherapy department on a regular basis. It is hoped that this information will keep you on track and prevent you from doing too much or too little. It is important that you do not overload the healing ligament. This will prevent any damage and allow you to return to the activities you want to do.
This programme is designed to guide you through the first 6 to 9 months after your operation. It will prepare you for returning to your normal activities. There is evidence that after ACL surgery, patients who are unable to attend physiotherapy sessions can achieve good outcomes with distant supervision.
The rehabilitation process following your surgery should be carried out under supervision from a physiotherapist and your surgeon. The information in this manual is based on the most up-to-date research on ACL rehabilitation.
Surgery:
To replace the ruptured ligament, most surgeons use the patient’s own tendons. They use these tendons as a graft (substitute) for the new ACL. Usually the hamstring tendon (at the back of the leg) on the same side as the operation is used. Alternatively, the patella tendon (at the front of the knee) can be used instead. Your surgeon will discuss this with you. The tendon used to repair the ACL will recover again in time.
Occasionally if the usual self donor sites are not able to be used then a donor graft may have to be used.
You will have swelling and pain in your knee after the operation. There may also be some bruising in your thigh and calf. You will also have 4 (sometimes 5) small wounds around the knee (Figure 1).
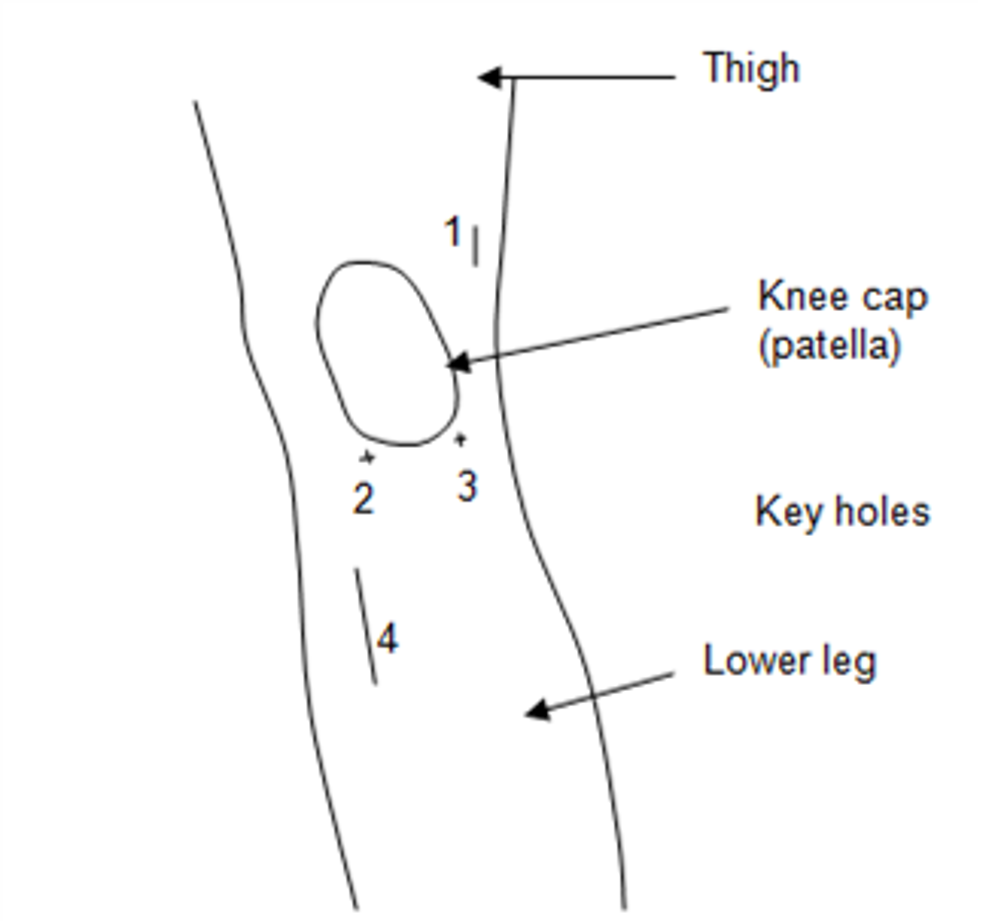
Figure 1: Front view of a left knee and wound positions post ACL surgery
You may be on crutches for up to 3 weeks. This will depend on your pain, swelling and muscle power.
Your Consultant will arrange to review you several weeks after your ACL operation.
General principles of rehabilitation
The main principles when gradually rehabilitating your knee following ACL surgery are:
- Control pain and swelling.
- Gradually restore full range of motion.
- Improve lower limb strength and joint stability.
- Improve your standing balance and co-ordination.
- Improve your general cardiovascular fitness.
There are five phases to rehabilitating your knee after ACL surgery.
Phases in ACL knee rehabilitation
Immediately post-operation
In hospital and discharge home
Phase 1
0 to 3 weeks
Phase 2
4 to 6 weeks
Phase 3
7 to 13 weeks
Phase 4
13 weeks to 9 months
Phase 5
+9 months
These timescales are only a guide. They may vary between individuals. Always seek advice from your physiotherapist or consultant if you have any concerns.
You will be able to gradually increase your exercises as time goes by. Your rehabilitation should be at a steady pace. Progress will depend on the time which has passed since your operation. It also depends on how your knee is reacting to exercise. Not everyone will respond at the same rate. Average time frames for return to normal activities are shown below.
Average time frames for return to normal activities of daily living
Driving
Up to 4 to 6 weeks depending on advice with your insurance company.
Return to Work
- Sedentary/Desk based activities usually within 4 to 6 weeks. May be earlier if working from home.
- Heavy duty work e.g. construction, usually 3 months.
Sports
- Cycling/swimming usually after 8 weeks post operation.
- Jogging/running usually after 4 months post operation.
- Golf usually after 4 months post operation.
- Jumping/hopping/cutting activities/changing direction usually after 6 months post operation.
- Contact/competitive sports e.g. skiing/football/rugby post operation usually after 9 to 12 months post operation.
Early Phase: Immediately post-operation. While in hospital and on discharge home.
Aims:
- Reduce pain and swelling.
- Protect the wound.
- To be able to manage and walk with crutches.
- Improve muscle recruitment.
Advice
Put your leg up regularly throughout the day. Use ice packs for 10 minutes every couple of hours to help reduce the pain and bruising.
Applying ice packs to the operated area in the early stages helps reduce pain, swelling and bruising. Application of ice can be repeated regularly, every 2 hours (while awake) in the first 24 hours. It must be done carefully. It is possible to get an ice burn.
Technique for ice treatment at home
- Use either a bag of frozen peas or a plastic bag with ice cubes.
- Cover the area to be treated with a damp tea towel or damp cloth.
- Place the ice pack over the area and hold in position with a towel or bandage.
- Leave for 10 to 15 minutes on bony areas. 20 to 25 minutes over more fleshy or muscular areas.
- Check the skin every 5 minutes and if painful or damaging the skin, remove the ice pack.
Wound Care
Keep the wound covered with a light dressing until the staples are removed. These are usually removed at 10 to 14 days after the operation. If there is any yellow discharge or abnormal redness seek advice from your physiotherapist or General Practitioner (GP).
Moving around
Move around with the help of your crutches. Keep your walking to short distances.
Exercise the knee gently at first. Do the exercises you were given by the physiotherapist on the ward.
Phase 1 - Exercises
Phase 1: Rehabilitation: Up to 3 weeks Post Operatio
Aims
- Reduce pain and swelling.
- Begin movement exercises, bending and straightening the knee.
- Begin muscle strengthening exercises.
Advice
Use ice as outlined in the previous section and elevate the leg regularly.
Guidance for Return to normal activities of daily living
The aim of phase 1 is to get the best start to the
rehabilitation process. Many of your normal day to day activities will gradually increase as you continue to recover after your operation. Your physiotherapist will be able to answer any questions you may have about your progress. You need to rest more in this case.
Things to avoid
- Do not sit and straighten the knee against resistance.
- Do not cross your legs.
- Do not run or jump.
- No twisting and swivelling movements.
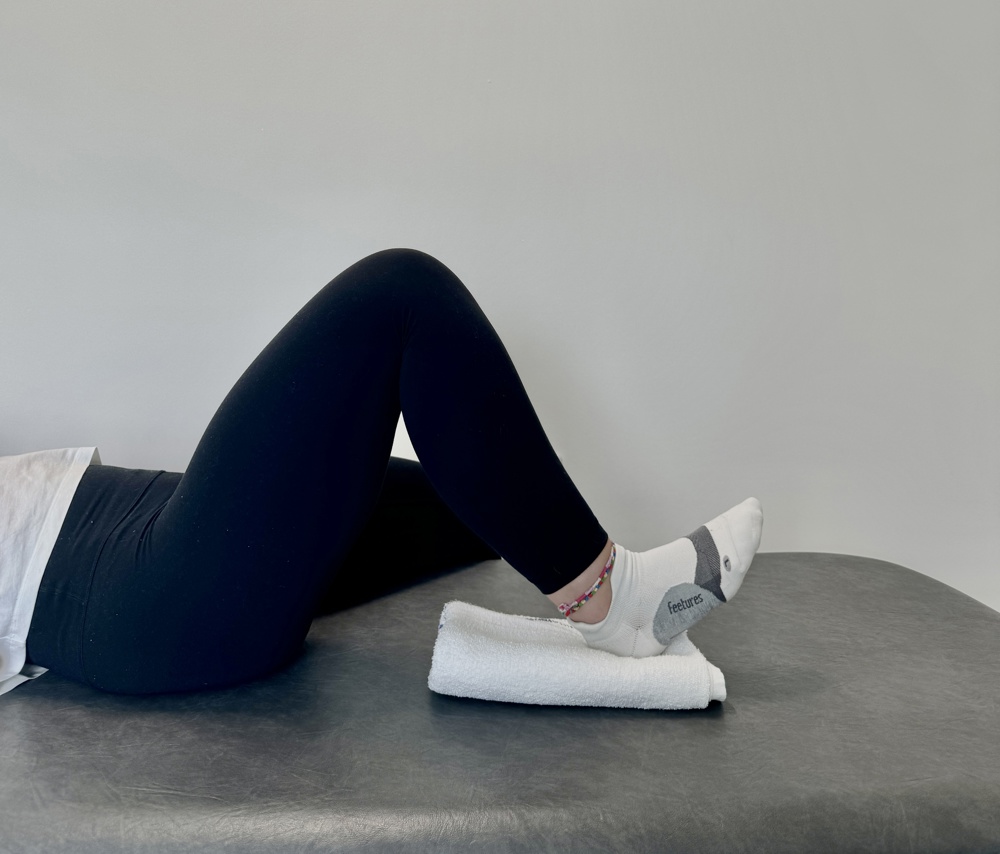
1. Range of Motion – Flexion A (Bending the knee)
Technique: Sitting with the legs straight or with the non operated leg over the edge of a bed. Bend your operated knee by sliding the heel up and down along the floor. Ideally you would want to do this on a smooth floor or surface such as a tray.
Repetitions: 10 times.
Sets: 3 sets at a time
Daily: Repeat every 1 to 2 hours during the daytime.
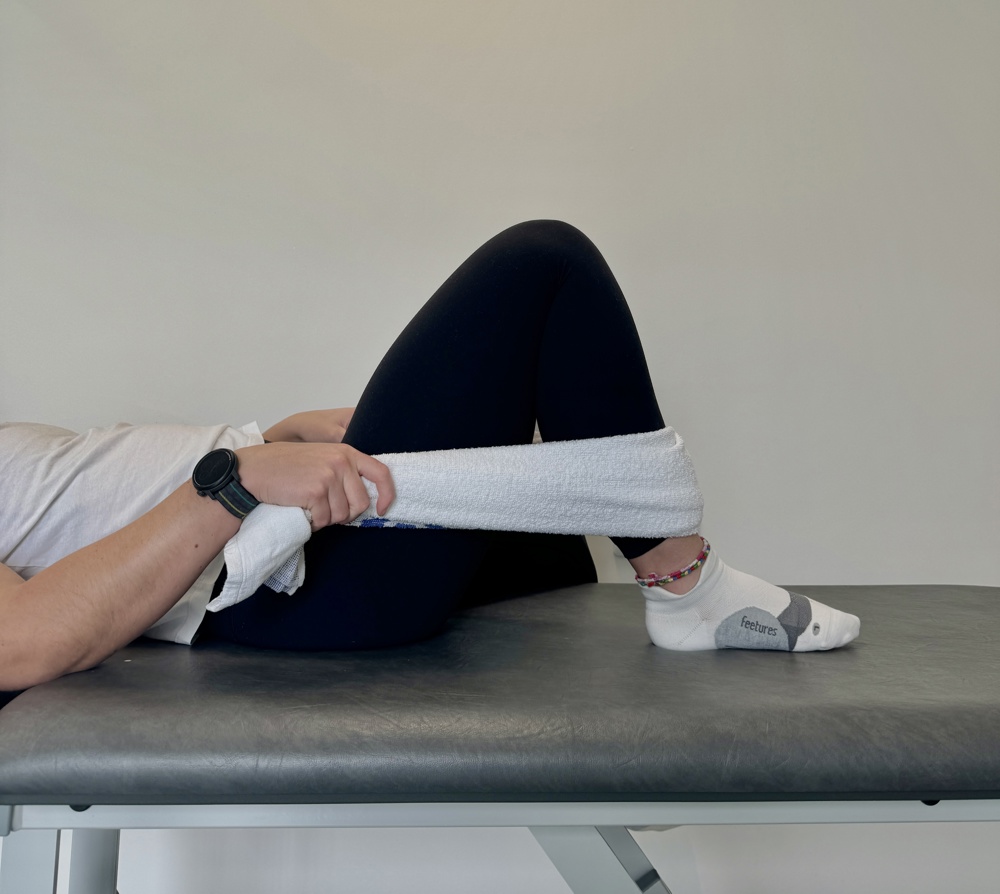
2. Range of Motion – Flexion B (Bending the knee)
Technique: If comfortable to do so, wrap a towel or scarf around the ankle of the operated leg. Pull on the towel to increase the amount of bend in the knee.
Repetitions: Hold the stretch for 20 seconds
Sets: 3 sets at a time
Daily: Repeat every 1 to 2 hours during the daytime.
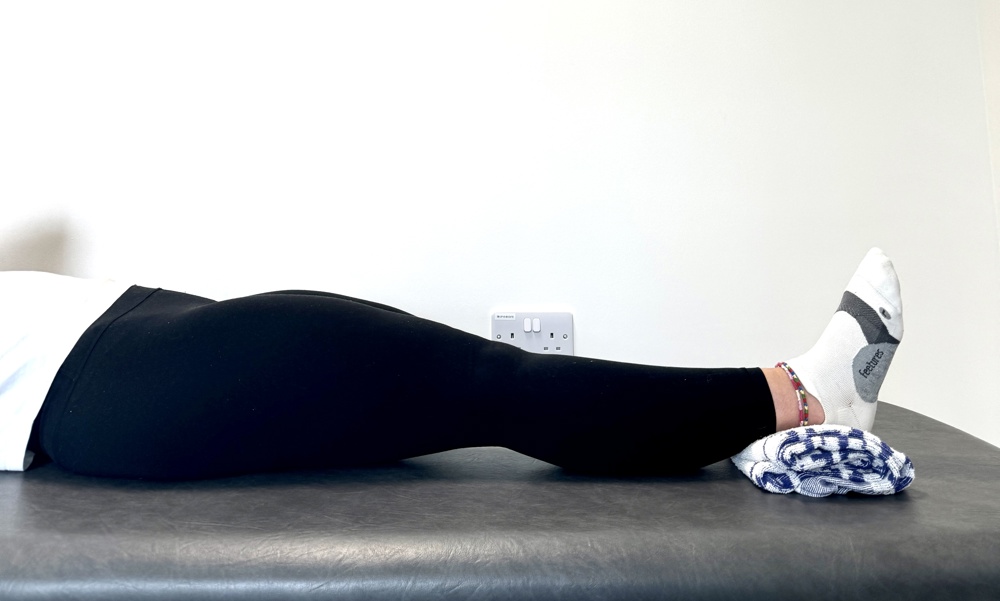
3. Range of Motion – Extension A (Straightening the knee)
Technique: Sit with the operated leg straight out in front and place a towel or wedge under the ankle so the back of the knee is unsupported.
Tighten the muscles at the front of the knee to straighten the knee into the gap underneath.
Repetitions: Hold the stretch for 20 seconds
Sets: 3 sets at a time
Daily: Repeat every 1 to 2 hours during the daytime.
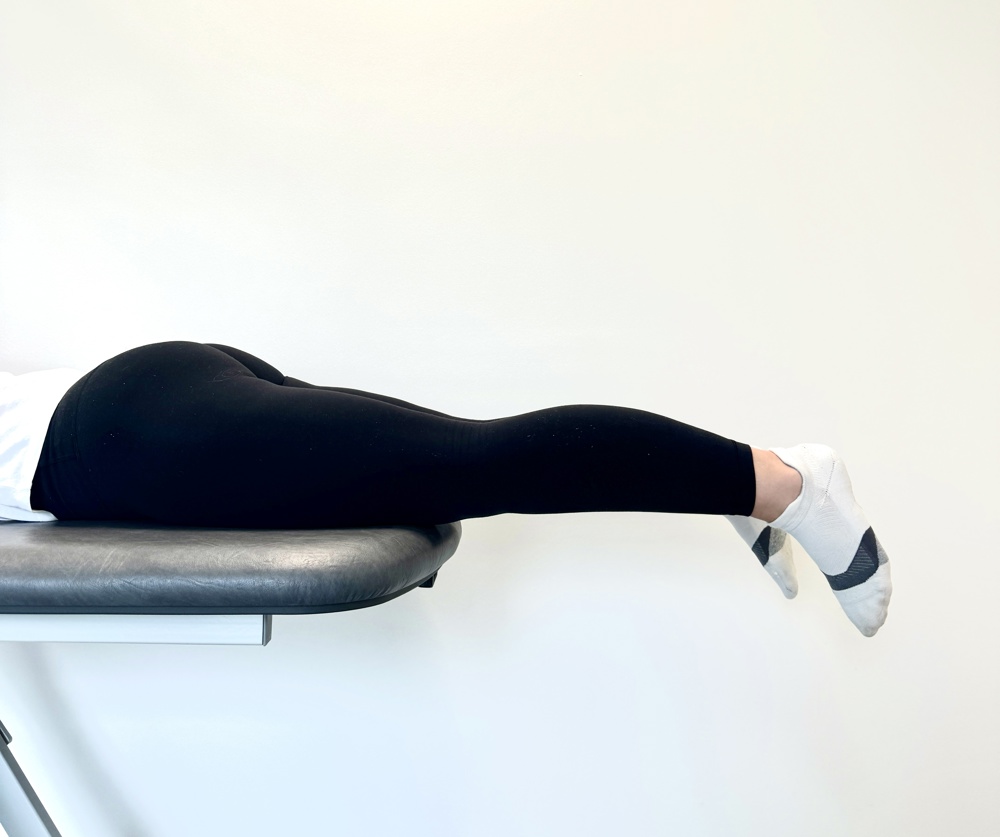
4. Range of Motion Extension B (Straightening the knee)
Technique: Lying on your front. Have your knees at the edge of the bed and your feet hanging off the bed. Tighten the muscles at the front of the operated knee and hold for 30 seconds.
Repetitions: Hold the stretch for 20 seconds
Sets: 3 sets at a time
Daily: Repeat 3 times during the daytime.
*N.B. Achieving full range of motion in the first few weeks after the operation is crucial. This speeds progress and
return to sports. There is evidence that it could prevent arthritis in the knee later in life.
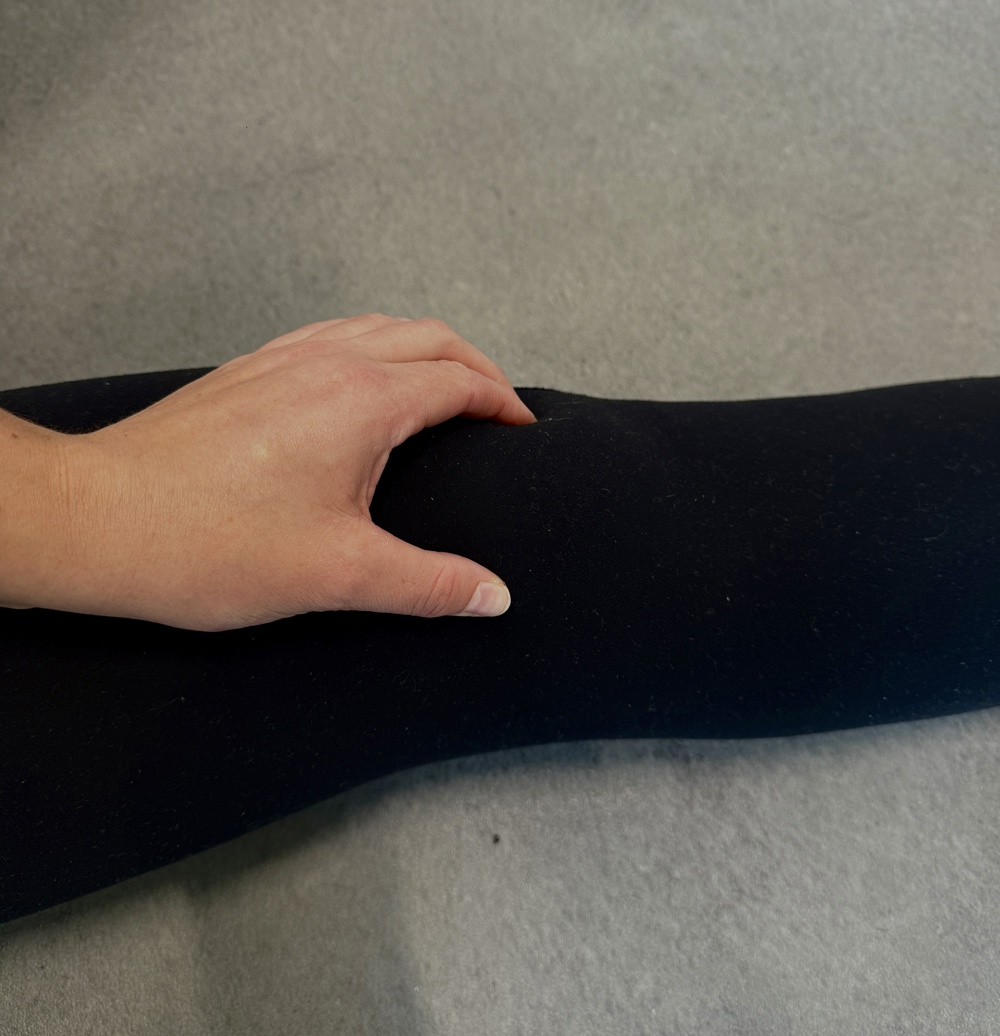
5. Kneecap (Patella) Mobilisations
Technique: Use the fingers to gently move the kneecap from side to side when the leg is at rest and knee straight.
Repetitions: Move the kneecap 30 times to each side.
Sets: 3 sets at a time
Daily: Repeat 3 times during the daytime.
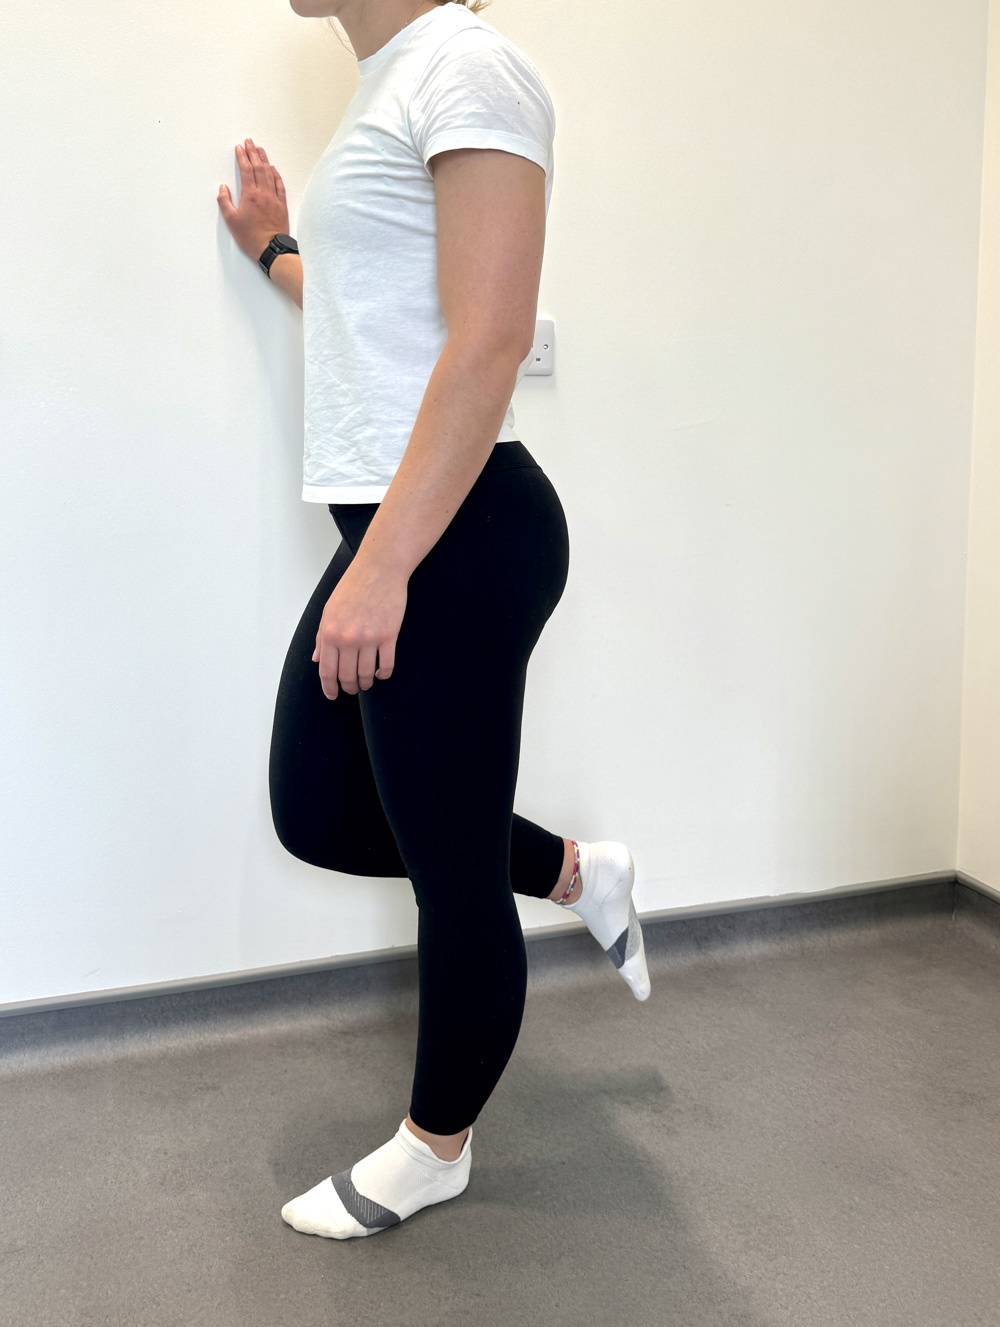
6. Single Leg Balance Exercises
Technique: Stand on the operated leg and slightly bend your knee. Use one finger against the wall for support if required.
Repetitions: Balance for up to 1 minute at a time
Sets: 5 sets at a time
Daily: Repeat 3 times during the daytime.

7. Quadriceps Strengthening (Front of Thigh)
Technique: Sitting or lying on the floor or on a bed with the operated leg straight out in front of you and supported. Push the back of your knee down into the floor or bed to contract your thigh muscle.
Repetitions: Hold the thigh contraction for 10 seconds at a time and repeat 10 times.
Sets: 3 sets at a time
Daily: Repeat 3 times during the daytime.
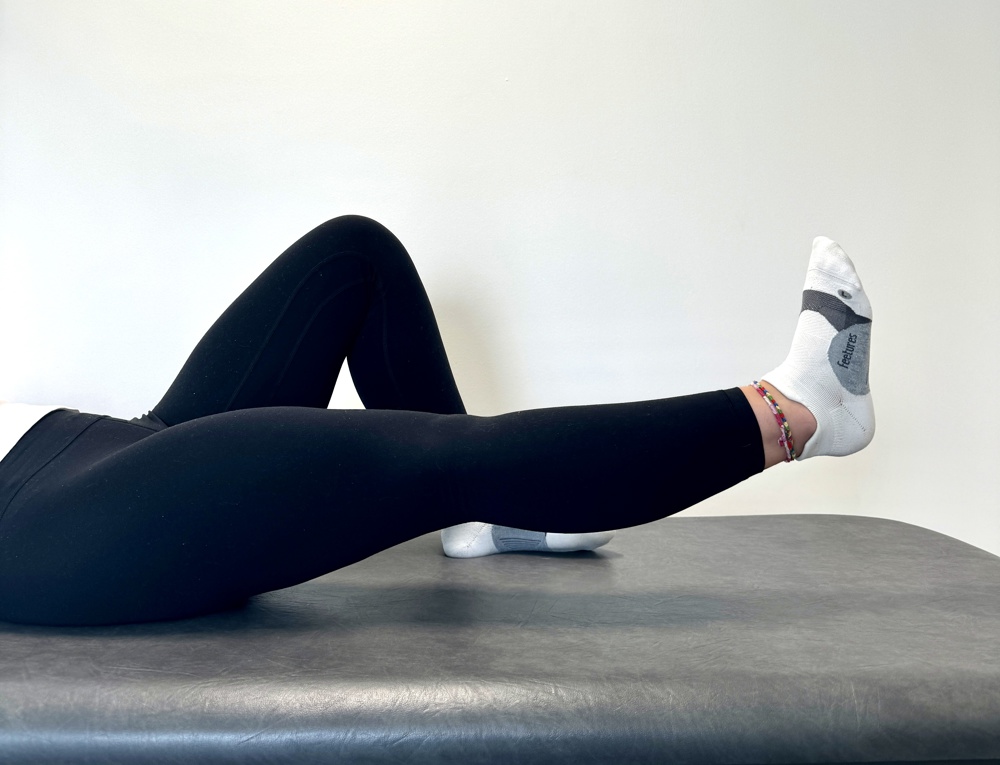
8) Straight Leg Raise
Technique: Sitting or lying down on the floor or on your bed. Keep your operated leg as straight as you can and lift the leg up approximately 20cm in the and then slowly lower back down.
Repetitions: Hold the leg raised for 10 seconds and repeat 10 times
Sets: 3 sets at a time
Daily: Repeat 3 times during the daytime
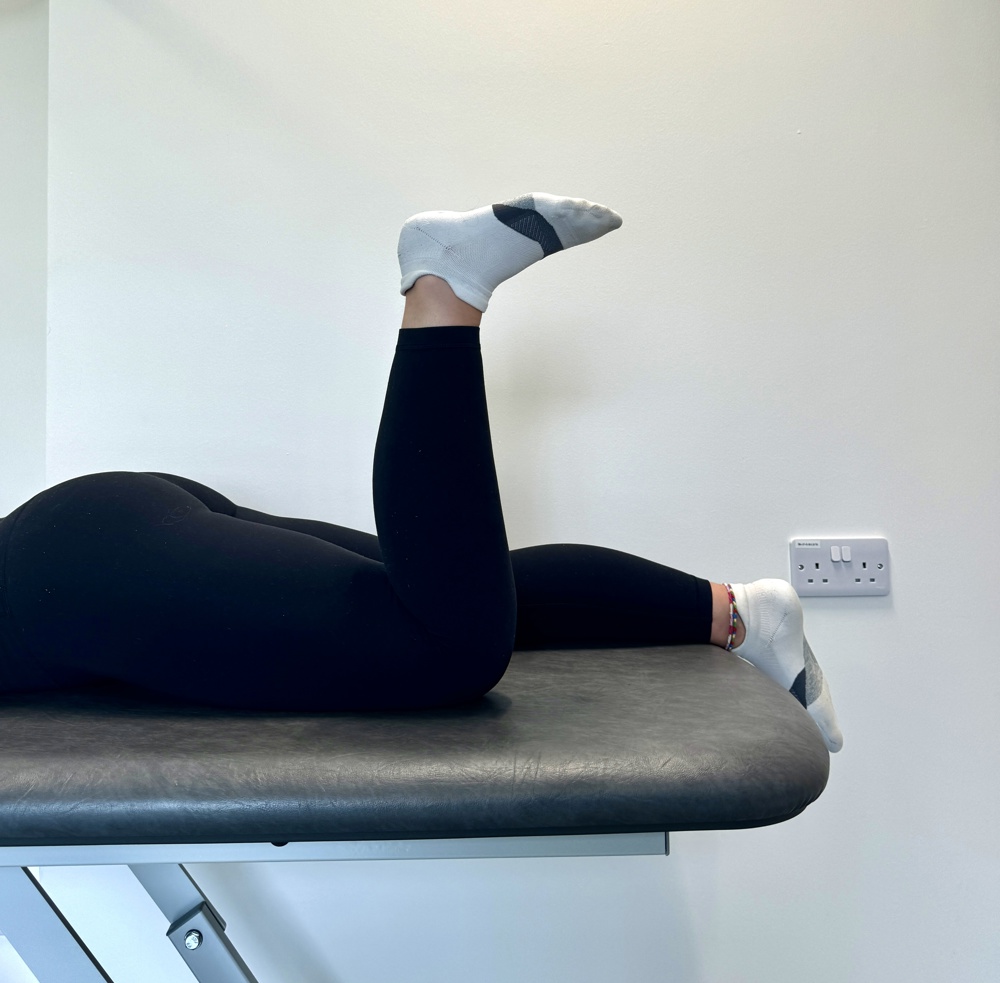
9. Prone Hamstring Strengthening (Back of Knee)
Technique: Lying on your front. Bend your operated knee up to 90 degrees (a right angle). Slowly lower back down.
Repetitions: 10 times.
Sets: 3 sets at a time
Daily: Repeat every 1 to 2 hours during the daytime.
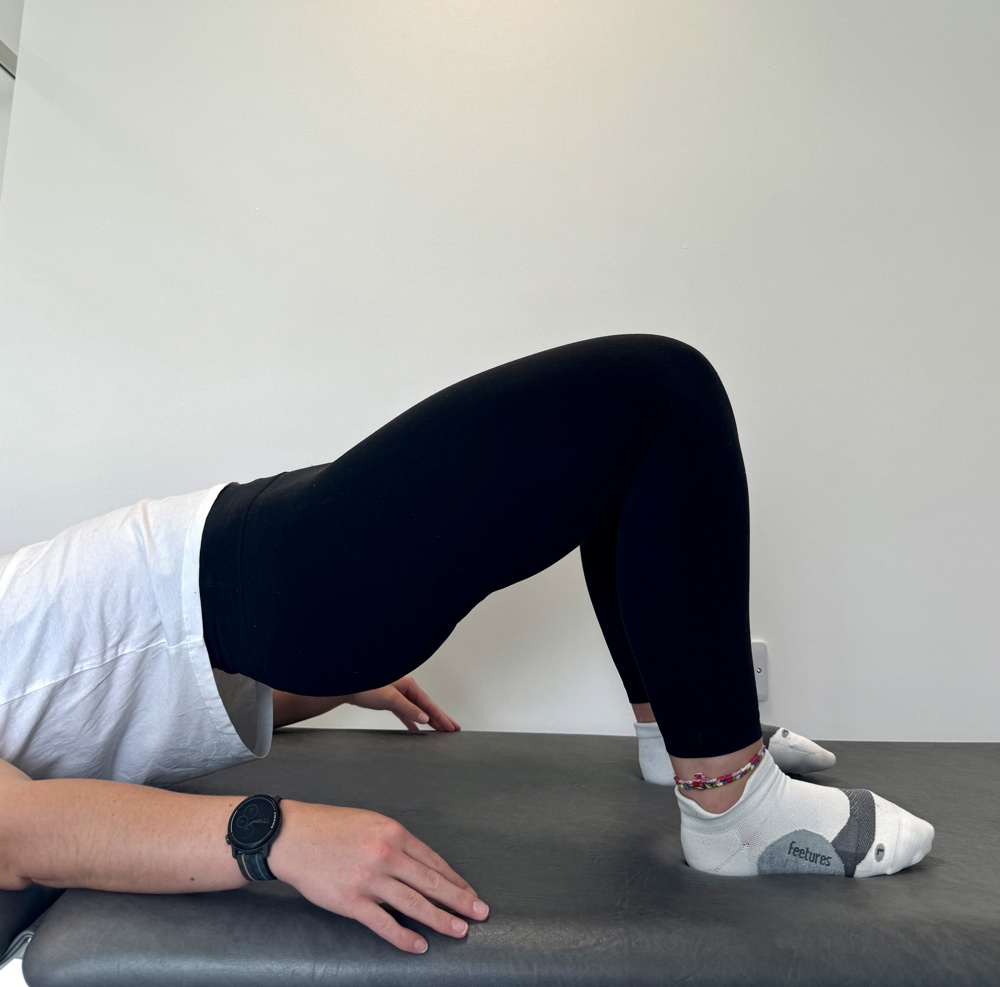
10. Bridging (Strengthening back hip muscles)
Technique: Lying on your back with both knees bent and feet on the floor. Tighten your tummy muscles. Lift your backside up off the bed and hold approximately 10 seconds. Then slowly lower back down. Relax your tummy muscles Try to keep the movement slow and controlled.
Repetitions: 10 times.
Sets: 3 sets at a time
Daily: Repeat 3 times during the daytime.
Repeat the previous exercise, but with less bend in your knees.
Repetitions: 10 times.
Sets: 3 sets at a time
Daily: Repeat 3 times during the daytime.
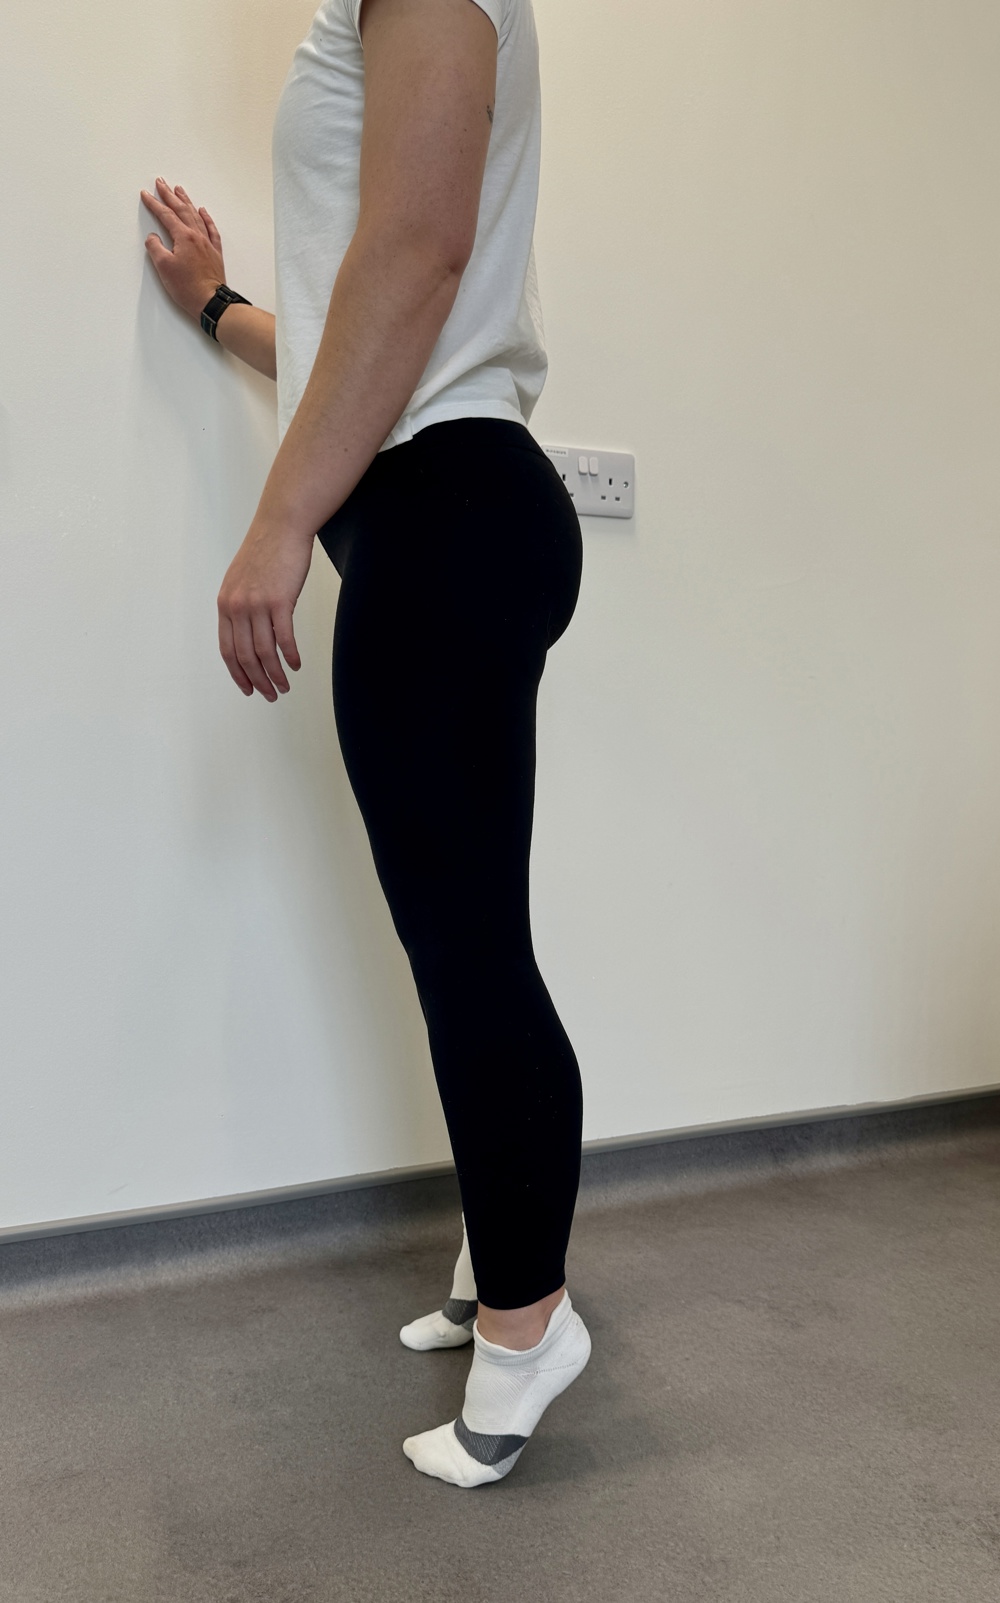
11. Calf Raises (strengthening back of ankle and knee)
Technique: Standing near a wall or kitchen worktop for support if required. Push up onto your toes on both feet as far as is comfortable. Then let your heels drop down slowly to the ground. Once on the ground lift the front of your feet up, rocking back slightly on your heels.
a) Knee straight
b) Knee slightly bent
Repetitions: 10 times.
Sets: 3 sets at a time
Daily: Repeat 3 times during the daytime.
.
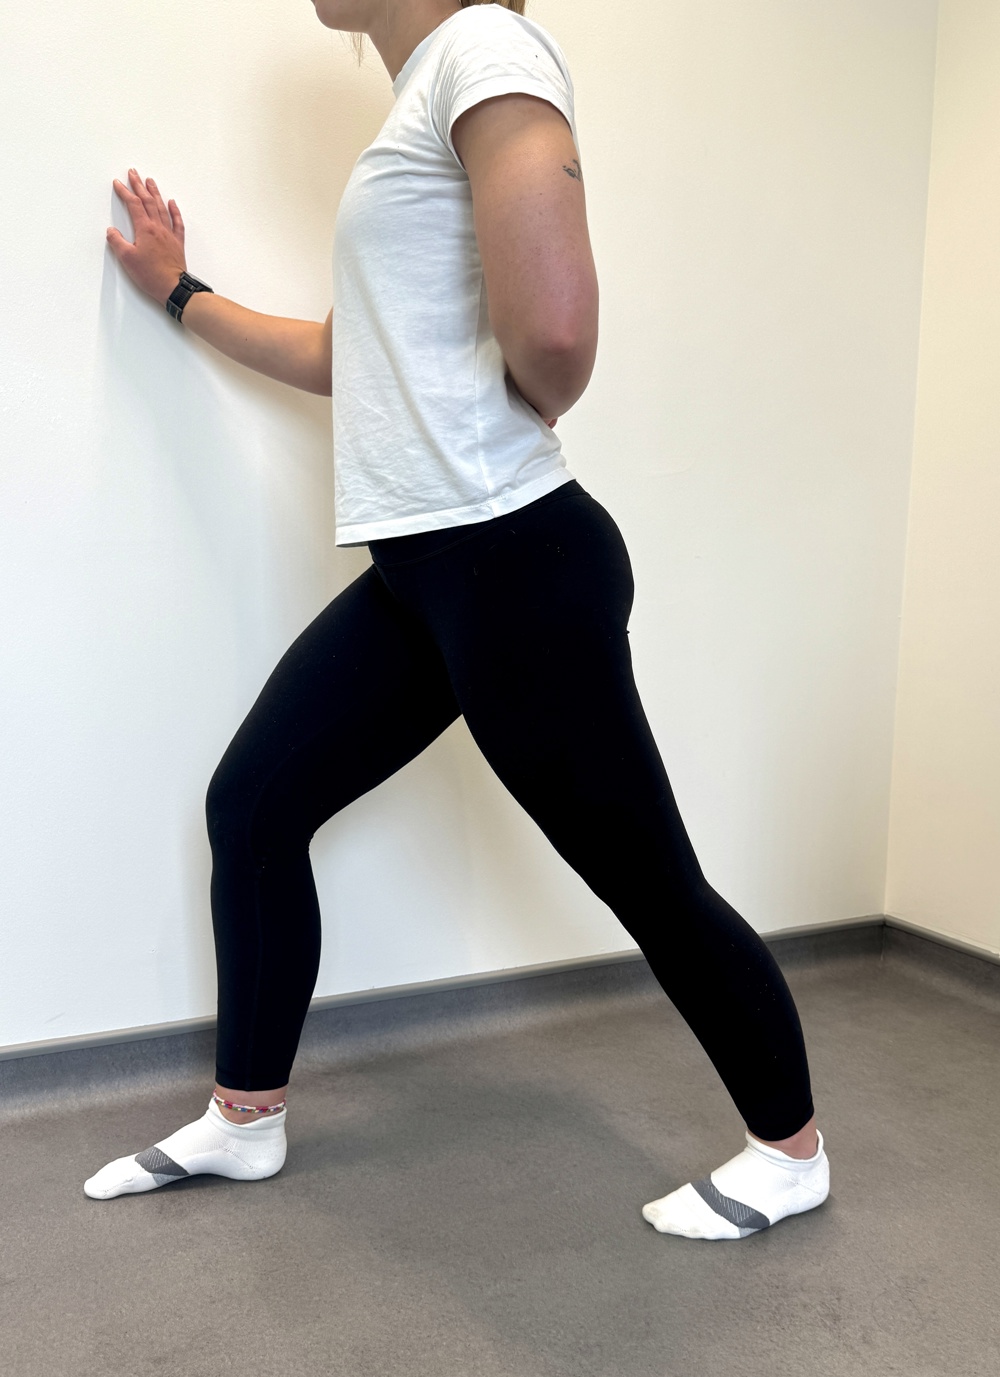
12. Calf Stretch
Technique: Stand facing a support (either the wall or kitchen worktop for support).
Take a step back with the foot you want to stretch. Ensure that this knee is straight, and the foot is pointing straight forward.
Then, lean forward towards the wall and keep your heel on the floor. Let your front knee bend. You should feel a gentle stretch in the middle of the calf muscle.
Repetitions: Hold the stretch for 20 seconds on each occasion
Sets: 3 sets at a time
Daily: Repeat 3 times during the daytime on both sides
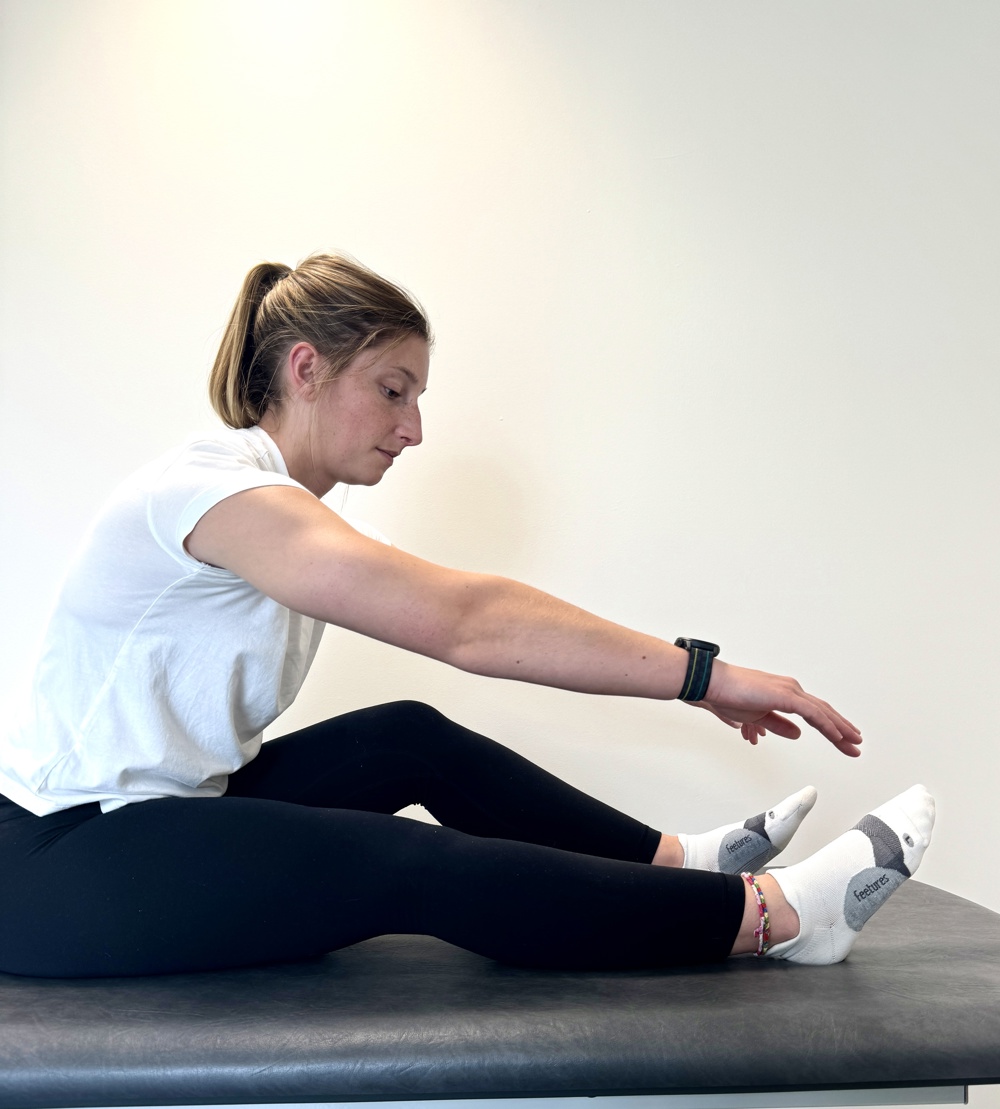
13. Hamstring Stretch
Sit on a floor with legs out in front. Keep the operated leg straight and bend the non operated leg slightly. Then sit as tall as you can and slowly reach forward with both hands out in front, to create a stretch in the muscles of the back of the thigh.
Repetitions: Hold the stretch for 20 seconds on each occasion
Sets: 3 sets at a time
Daily: Repeat 3 times during the daytime
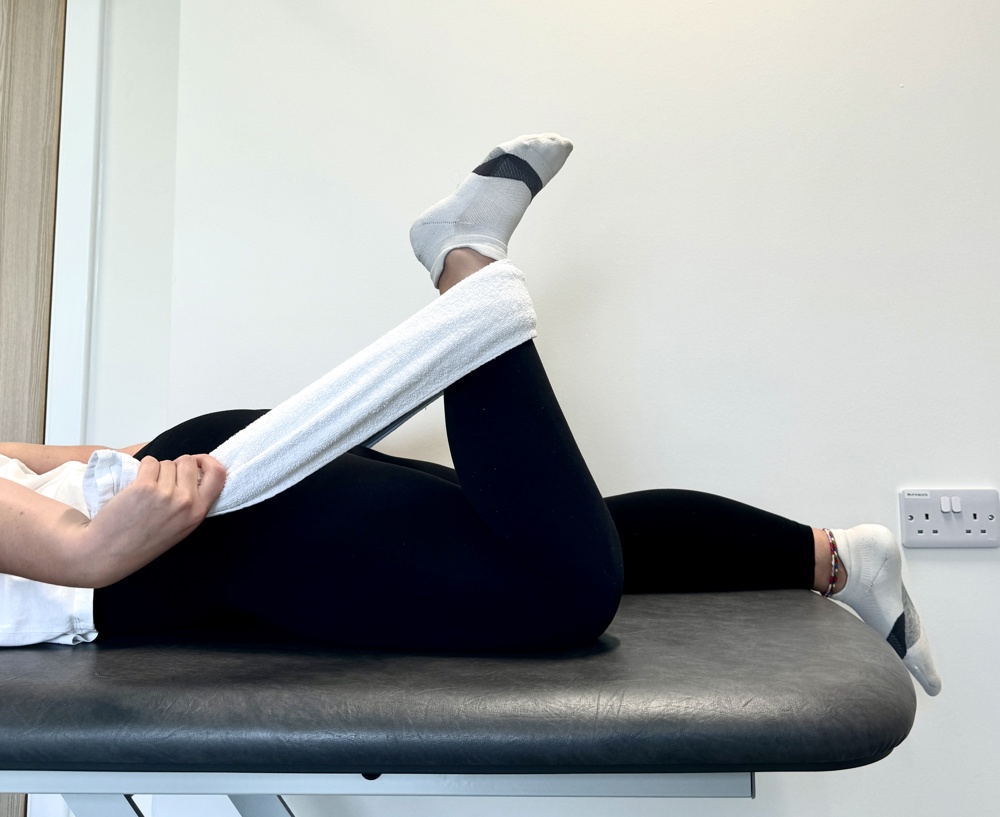
14. Thigh (Quadriceps) Stretch (lying on your back or your side)
Technique a: Lying on your front or your side.
Bend your operated knee and draw the foot slightly closer to your bottom with the use of a towel until you feel a stretch in the front of your thigh. Try to keep your thigh in line with the rest of your body.
Repetitions: Hold the stretch for 20 seconds on each occasion
Sets: 3 sets at a time
Daily: Repeat 3 times during the daytime.
Technique b: Lying on your back with the operated leg over the edge of the bed.
Have your knee bent and draw the foot slightly closer to the bottom with the use of a towel until you feel a stretch in the front of your thigh.
Repetitions: Hold the stretch for 20 seconds on each occasion
Sets: 3 sets at a time
Daily: Repeat 3 times during the daytime.
Phase 2 Rehabilitation: Weeks 4 to 6
Criteria for Progression onto Phase 2:
- Minimal or no pain/swelling
- Able to fully weight bear
- No giving-way
- Good range of movement.
Aims
- Reduce pain and swelling
- Restore full range of motion
- Mobilise independently
Guidance for return to normal activities of daily living
- Sedentary/desk based activities usually within 4 to 6 weeks, earlier if working from home.
- Heavy duty work e.g. construction not usually until 3 months.
- Driving can be commenced at 6 weeks under consultation with your insurance company.
Things to Avoid
- Do not cross your legs
- Do not run or jump
- No twisting and swivelling movements
Phase 2 – Exercises
- Phase 2 – Exercises
- 1) Continue with the following exercises from Phase 1:
- Bending and Straightening (Range of motion)
- Kneecap mobilization
- Prone hamstring strengthening
- Bridging
- Calf Raises
- Calf, Hamstring and Thigh (Quadriceps) stretching
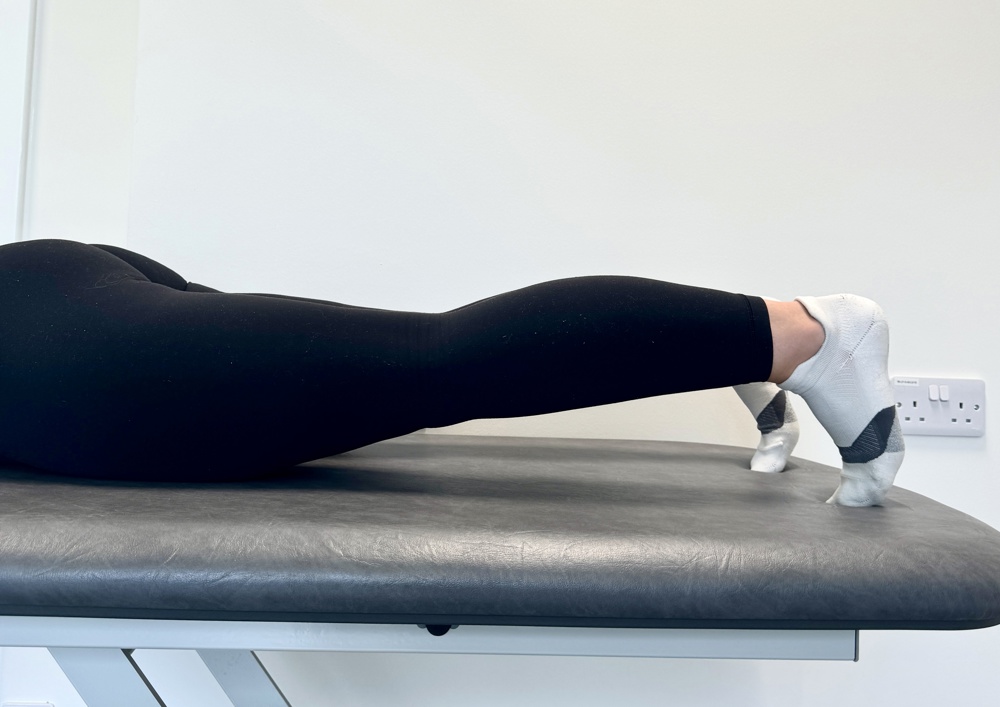
2. Thigh (Quadriceps) Strengthening
Technique: Lying on your front with your toes curled under and in contact with the floor. Push your thigh of your operated leg off the floor by tightening your thigh muscle. Try to keep your pelvis on the floor
Repetitions: Hold for 10 seconds and relax the leg down and repeat 10 times.
Sets: 3 sets at a time
Daily: Repeat 3 times during the daytime.
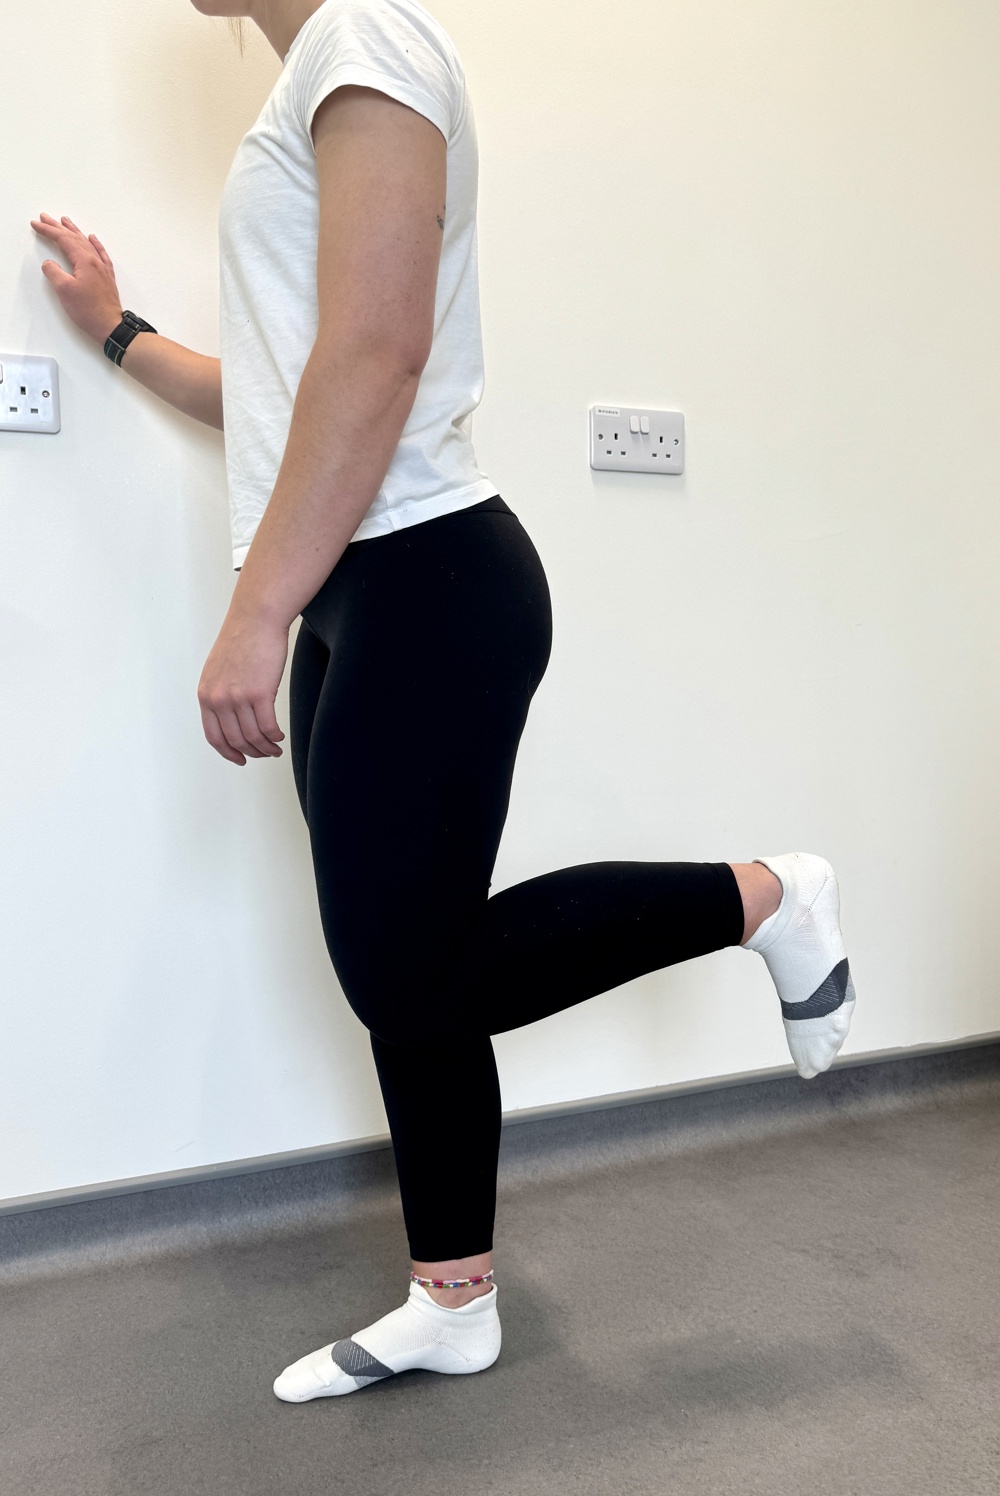
3. Standing Hamstring Curls
Technique: In standing place the fingers against the wall to provide some support. Bend the operated knee, bringing your heel up towards your backside and then slowly lower back down. Try to keep your thighs level throughout.
Repetitions: 10 times
Sets: 3 sets at a time
Daily: Repeat 3 times during the daytime.
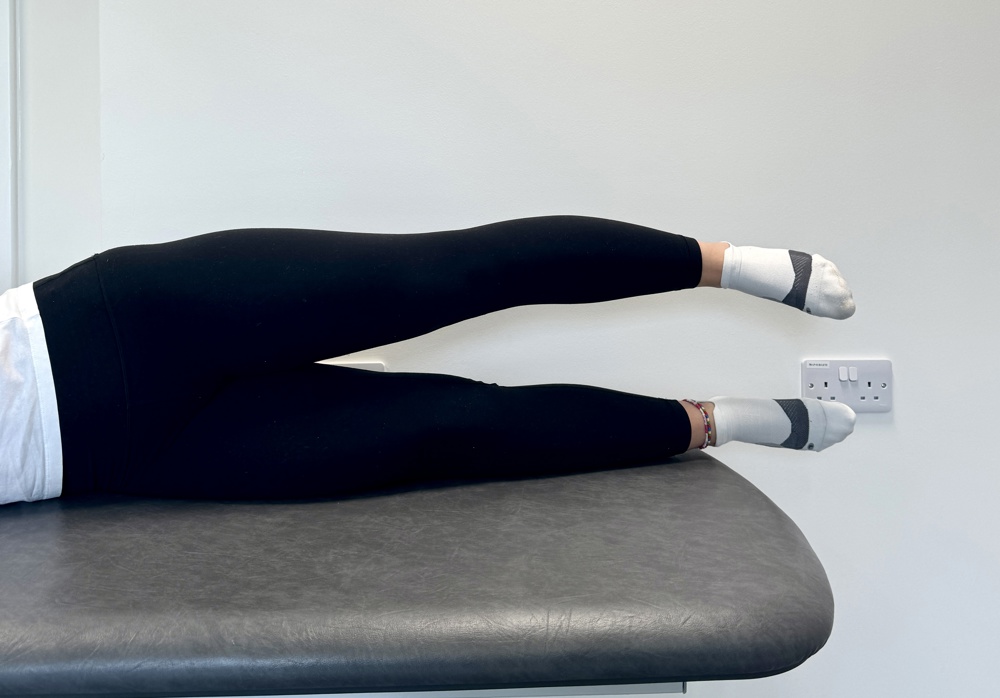
4. Hip Abduction (side movement)
Technique: Lying on your non operated side with your body in a straight line. Lift the operated leg straight up in the air approximately 20cm and then slowly lower back down.
Repetitions: Hold the leg in air for 10 seconds and repeat 10 times.
Sets: 3 sets at a time
Daily: Repeat 3 times during the daytime.
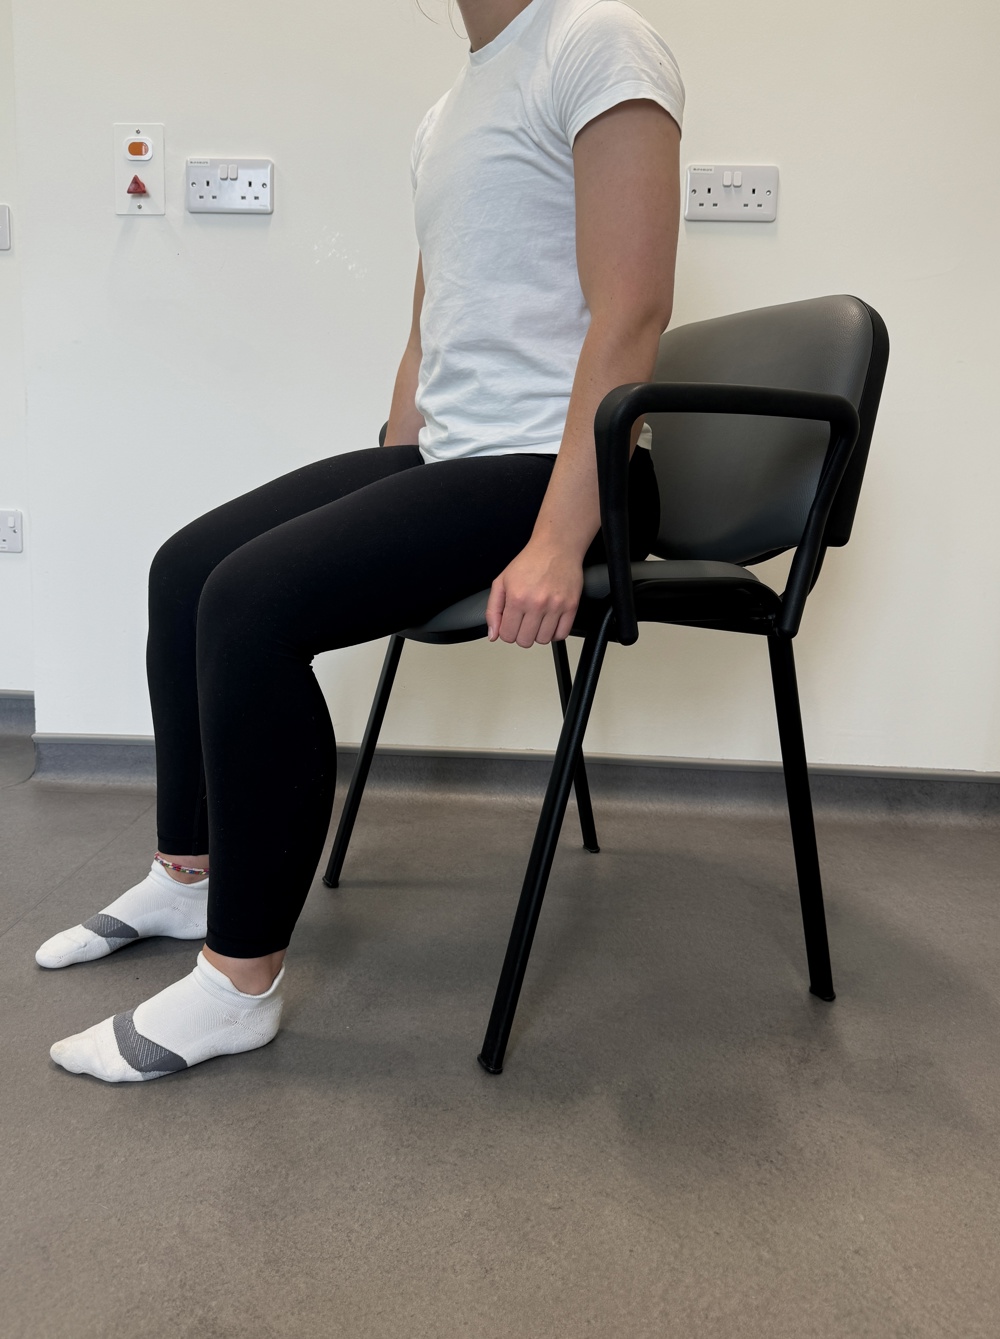
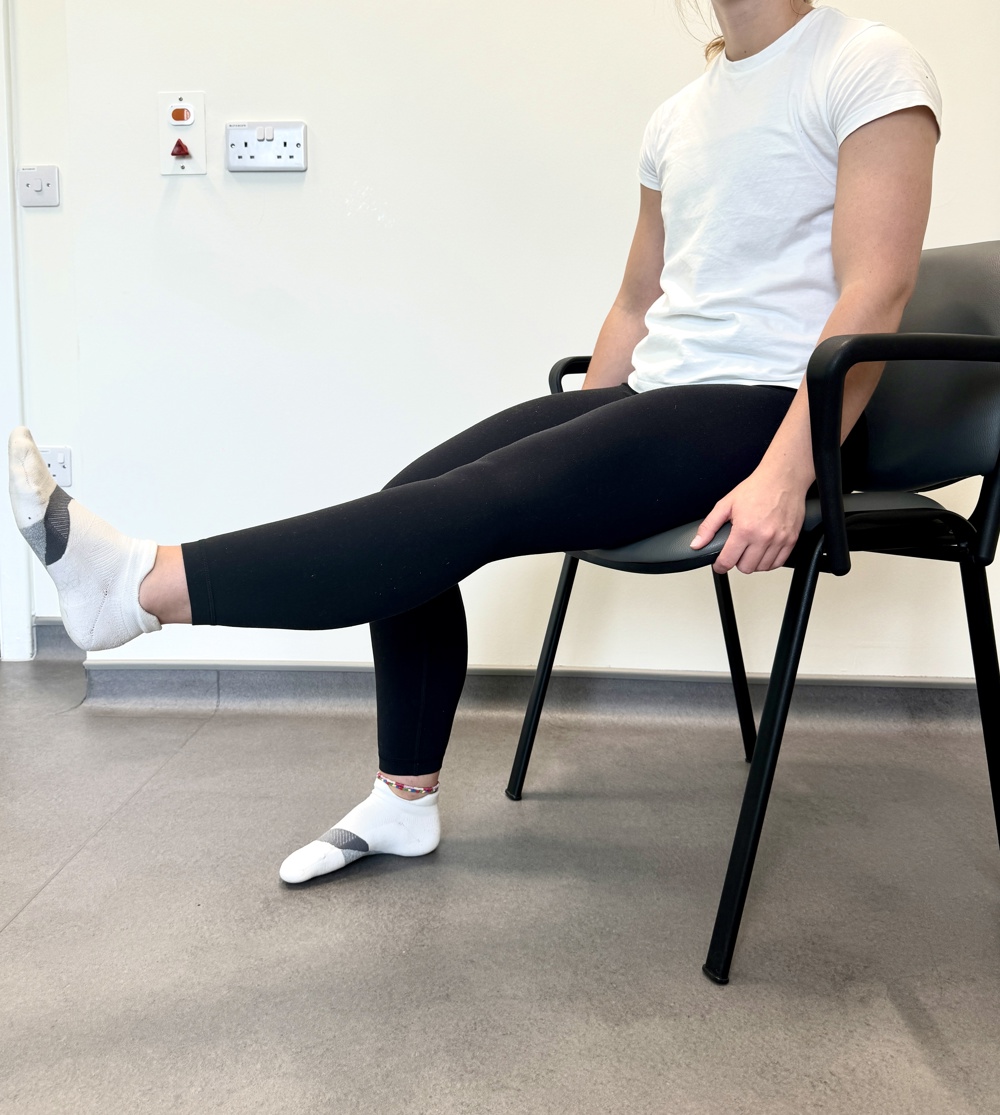
5. Knee extension
Technique: Sit up straight on a sturdy chair, so that your feet are supported on the floor. Straighten your knee by using your front thigh muscles. In a controlled manner, return to the starting position. No weights added to ankle.
Repetitions: 10 times
Sets: 3 sets at a time
Daily: Repeat 3 times during the daytime.
Missing image
6. Cardiovascular fitness
a) Walking
Technique: You should normally be managing without your crutches at this point. You can gradually start to build up your walking distance. Be careful not to overdo it. Your knee can still swell up easily and this can slow down your progress.
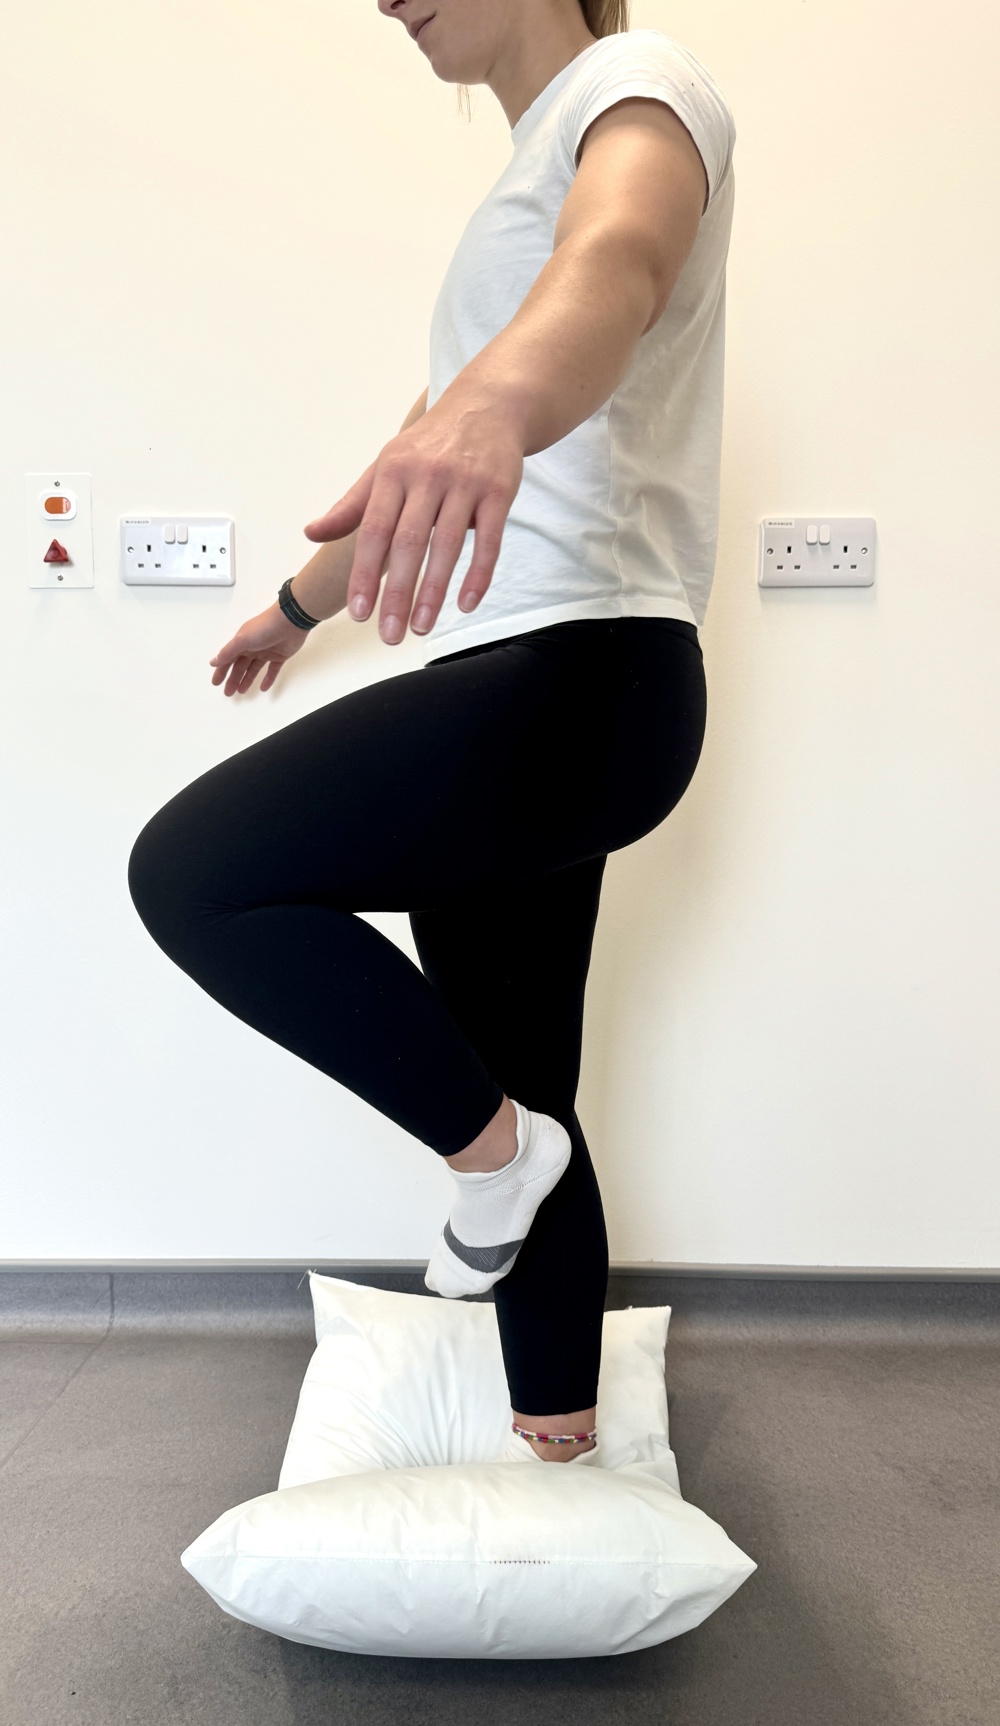
7. Balance Exercises
a. Single Leg Balance
Technique: Stand on a cushion or a towel. These are surfaces which will challenge your balance and co-ordination more than standing on a bare floor.
Repetitions: Balance for up to 1 minute at a time
Sets: 3 sets at a time
Daily: Repeat 3 times during the daytime.
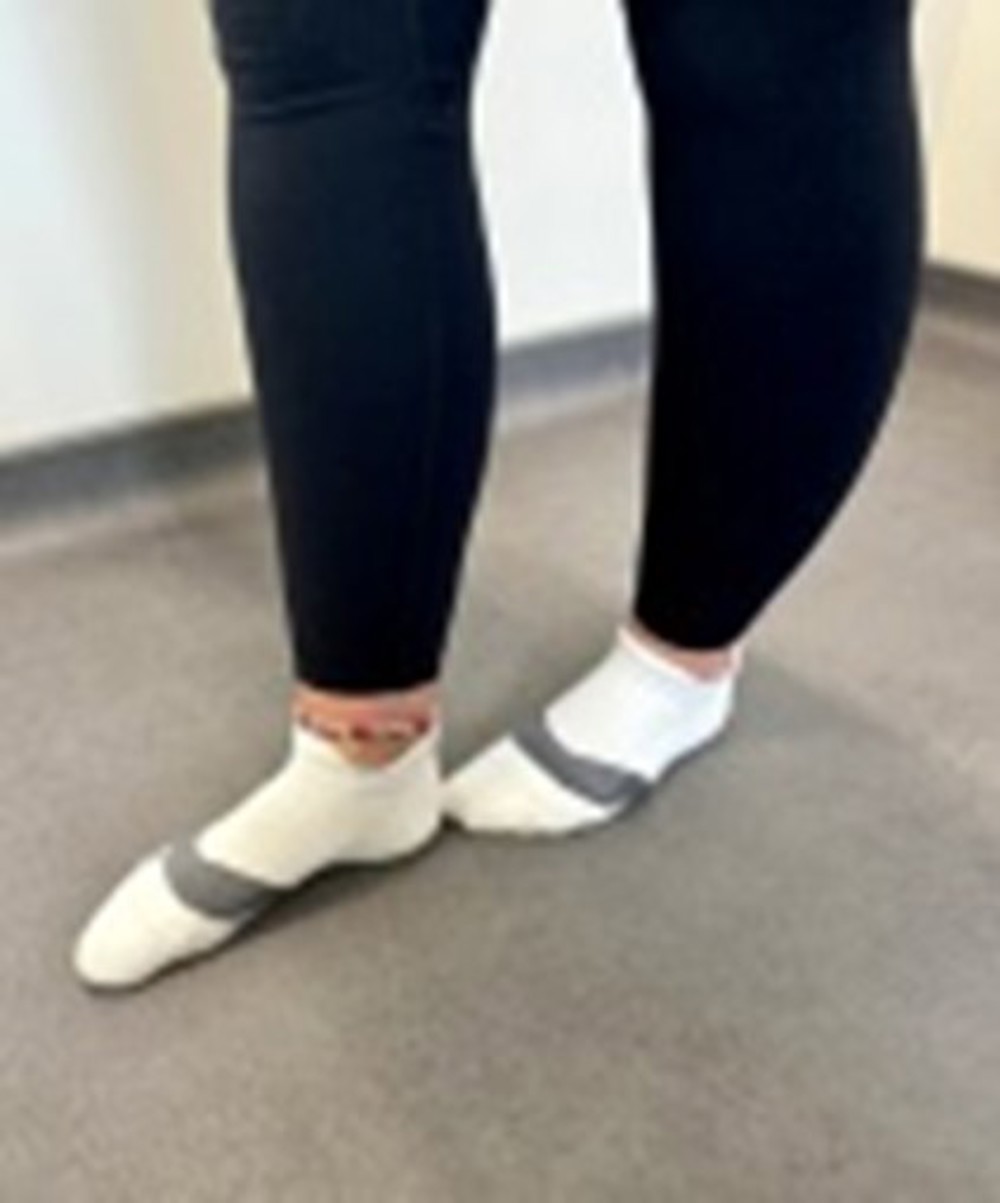
b. Heel-to-toe Walking
Technique: Walk in a straight line, placing the heel of one foot directly in front of the toes of the other.
Repetitions: Balance for up to 1 minute at a time
Sets: 3 sets at a time
Daily: Repeat 3 times during the daytime.
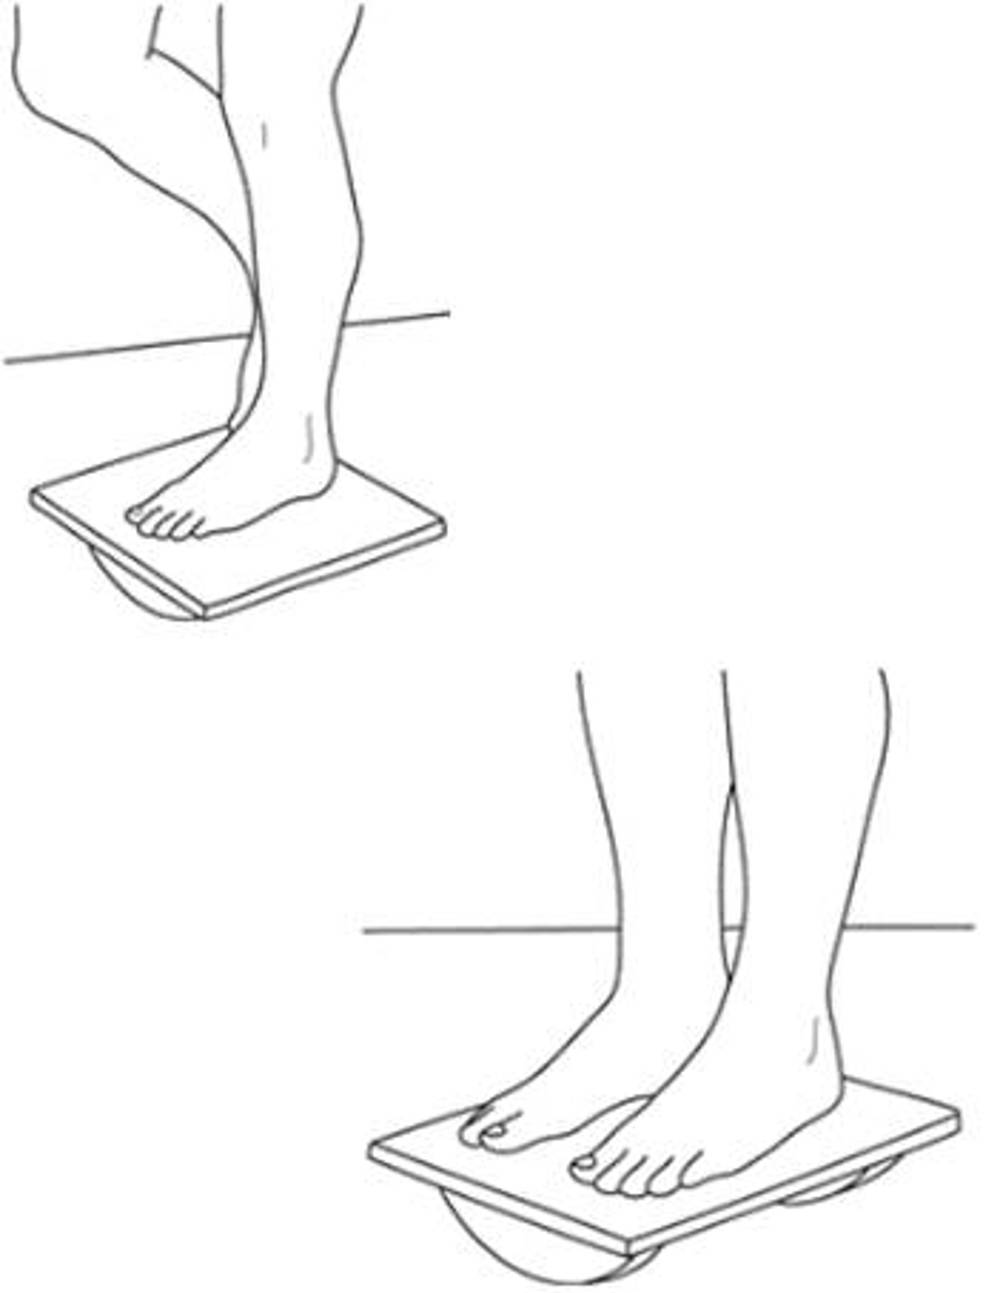
c. Balance Board
Technique: Stand with both feet perpendicular to Rocker bottom of the board. Avoid hyperextending your knees. Progression: Standing on operated leg.
Repetitions: Balance for up to 1 minute at a time
Sets: 3 sets at a time
Daily: Repeat 3 times during the daytime.
Phase 3 Rehabilitation: Weeks 7 to 13
Criteria for progression to Phase 3:
Must be able to:
- Fully straighten (extend) the operated knee.
Preferably be able to:
- Fully bend (flex) the operated knee.
- Have minimal pain/swelling
Your graft is at its most vulnerable at the start of this phase.
Aims of the phase
- To regain full range of movement, if not already achieved.
- To build up leg strength.
- To improve balance and coordination.
Guidance for return to normal activities of daily living
- Return to moderate manual work as agreed with consultant.
- Cycling/Swimming usually after 8 weeks post operation.
- Return to swimming (avoid breaststroke leg kick)
Continue to avoid twisting and high impact activities.
- No kicking.
- No running.
- No jumping.
- No twisting/swiveling.
- No open chain thigh (quadriceps) exercises.
- Do not cross your legs.
Phase 3 - Exercises
- Continue with the following exercises from Phase 1 and Phase 2:
a. Bending and Straightening (Range of motion)
b. Calf, Hamstring and Thigh (Quadriceps) stretching
c. Hip strengthening bridging
d. Calf Raises
e. Single leg balance
Missing image
2. Knee extension
Technique: Sit up straight on a sturdy chair, so that your feet are supported on the floor. Fully straighten your knee by using your front thigh muscles and hold for 10 seconds. In a controlled manner, return to the starting position.
Repetitions: 10 times
Sets: 3 sets at a time
Daily: Repeat 3 times during the daytime.
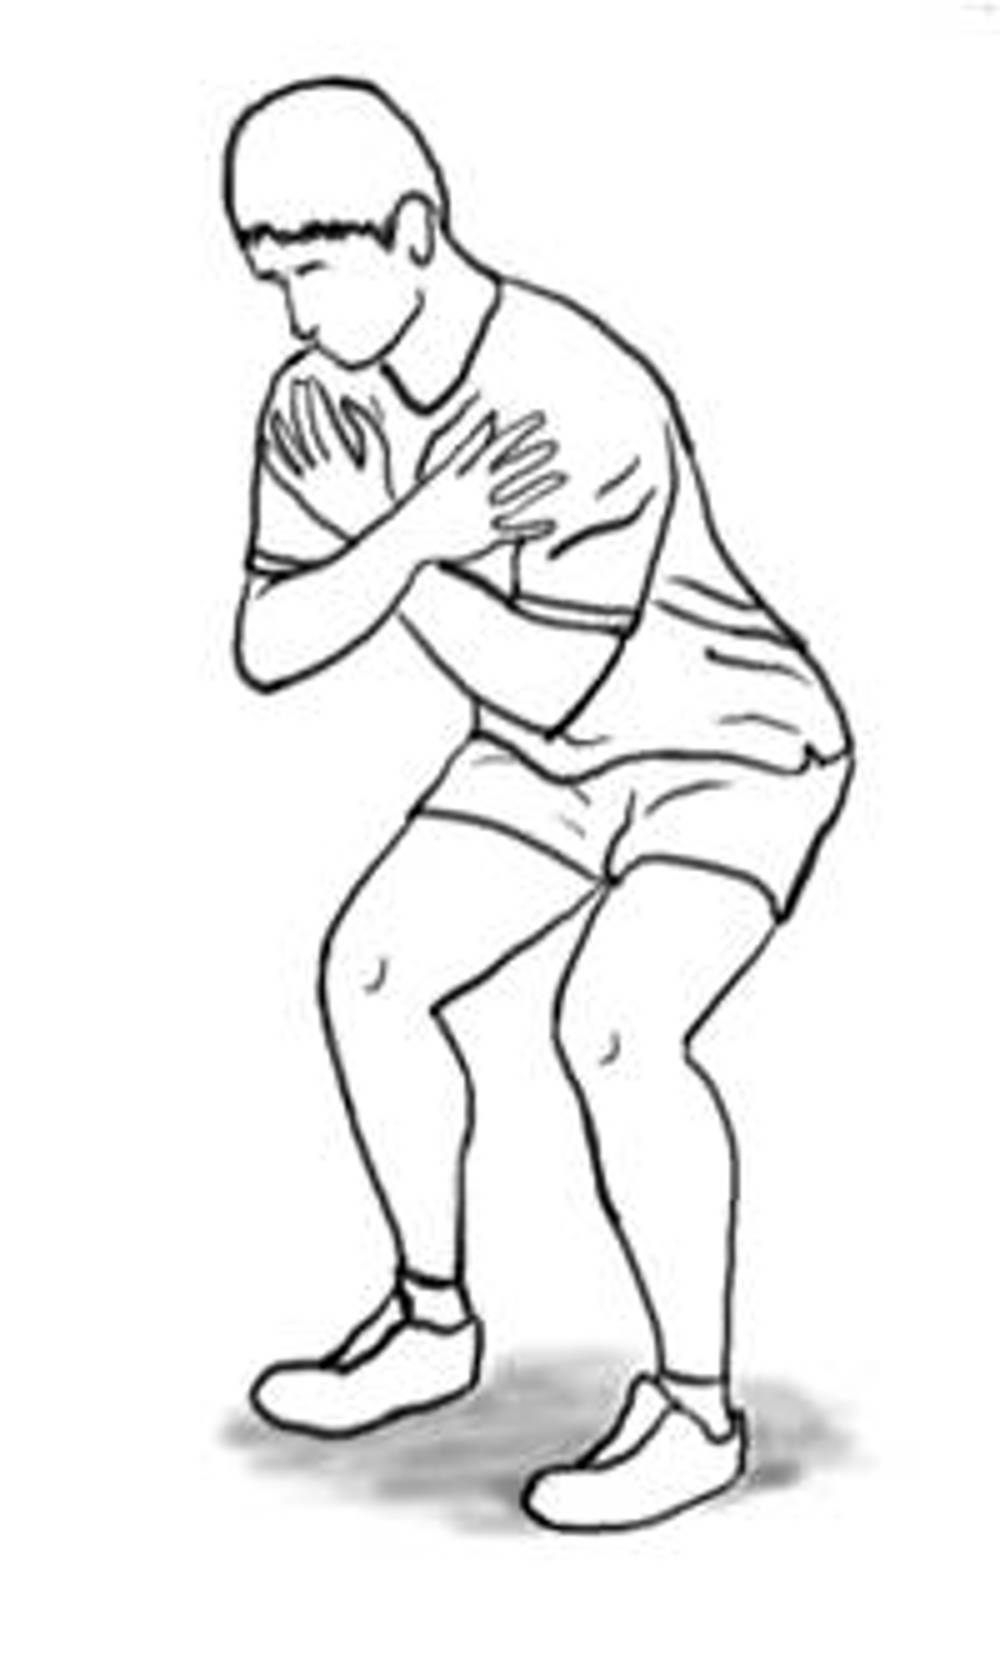
3. Squats
Technique: Stand with your feet shoulder width apart, toes pointing outwards slightly.
Bend equally to approximately 90 degrees at both the hips and knees. Maintain a neutral back with bottom tucked in throughout. Return to start position.
Repetitions: 10 times
Sets: 3 sets at a time
Daily: Repeat 3 times daily.
Exercise progression: Hold light weights in each hand
.
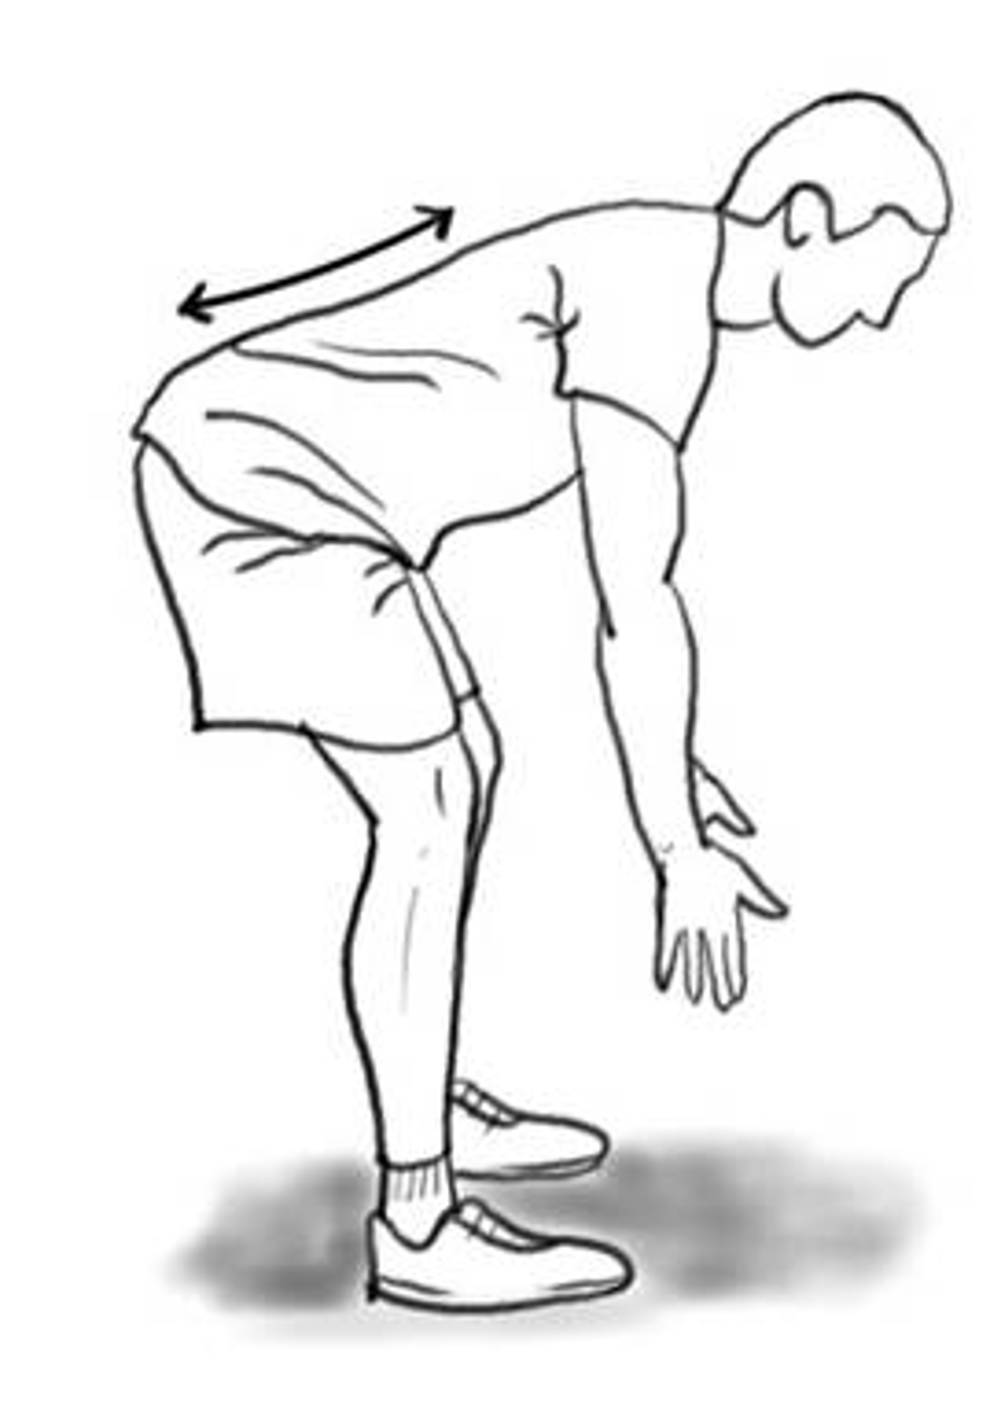
4. Deadlifts
Technique: Stand with your feet shoulder width apart, toes pointing outwards slightly.
Unlock/soften the knees and bend forward at the hips until a stretch is felt behind the thighs. Maintain a straight back position throughout. Return to start position.
Repetitions: 10 times
Sets: 3 sets at a time
Daily: Repeat 3 times daily.
Exercise progression: Hold light weights in each hand.
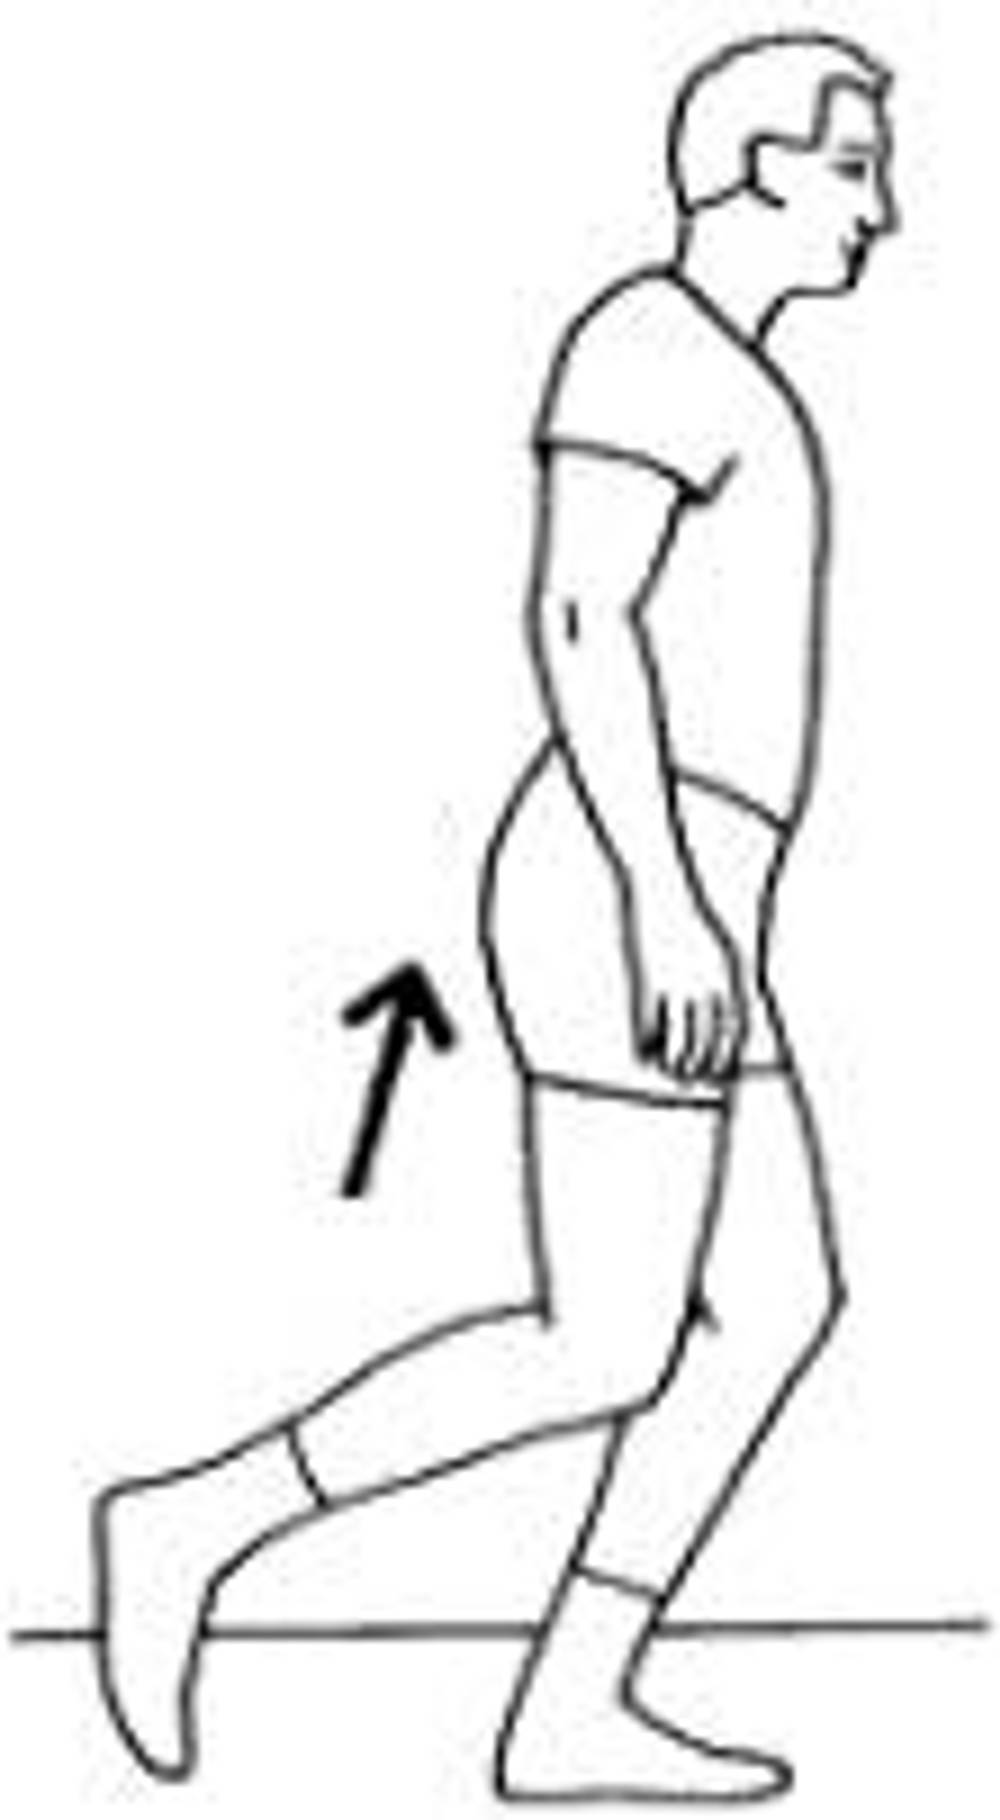
5. Mini dips
Keep your body in a straight line. Then, lift your unaffected leg and bend your standing knee. Bend the standing knee as much as possible, then straighten the knee. You may need to start with a smaller bend before progressing. If you feel unbalanced, stabilize yourself by holding onto a wall or chair.
Repetitions: 10 times
Sets: 3 sets at a time
Daily: Repeat 3 times daily.
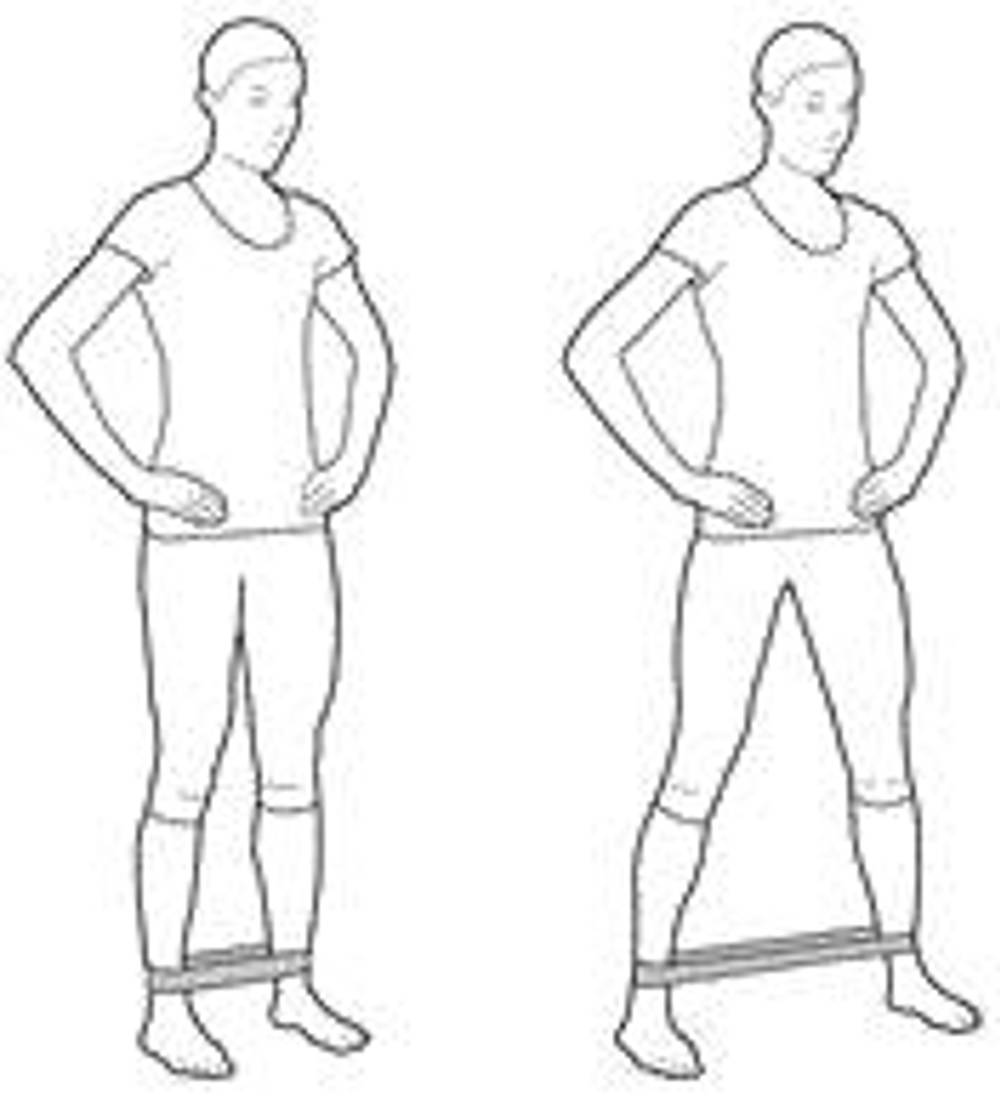
6. Band Walks
Technique: Start by standing with a mini band around both ankles or knees. Have a soft bend in your knees and take steps sideways against the resistance from the band. Feel the tension in your buttocks.
Repetitions: 10 times
Sets: 3 sets at a time
Daily: Repeat 3 times daily.
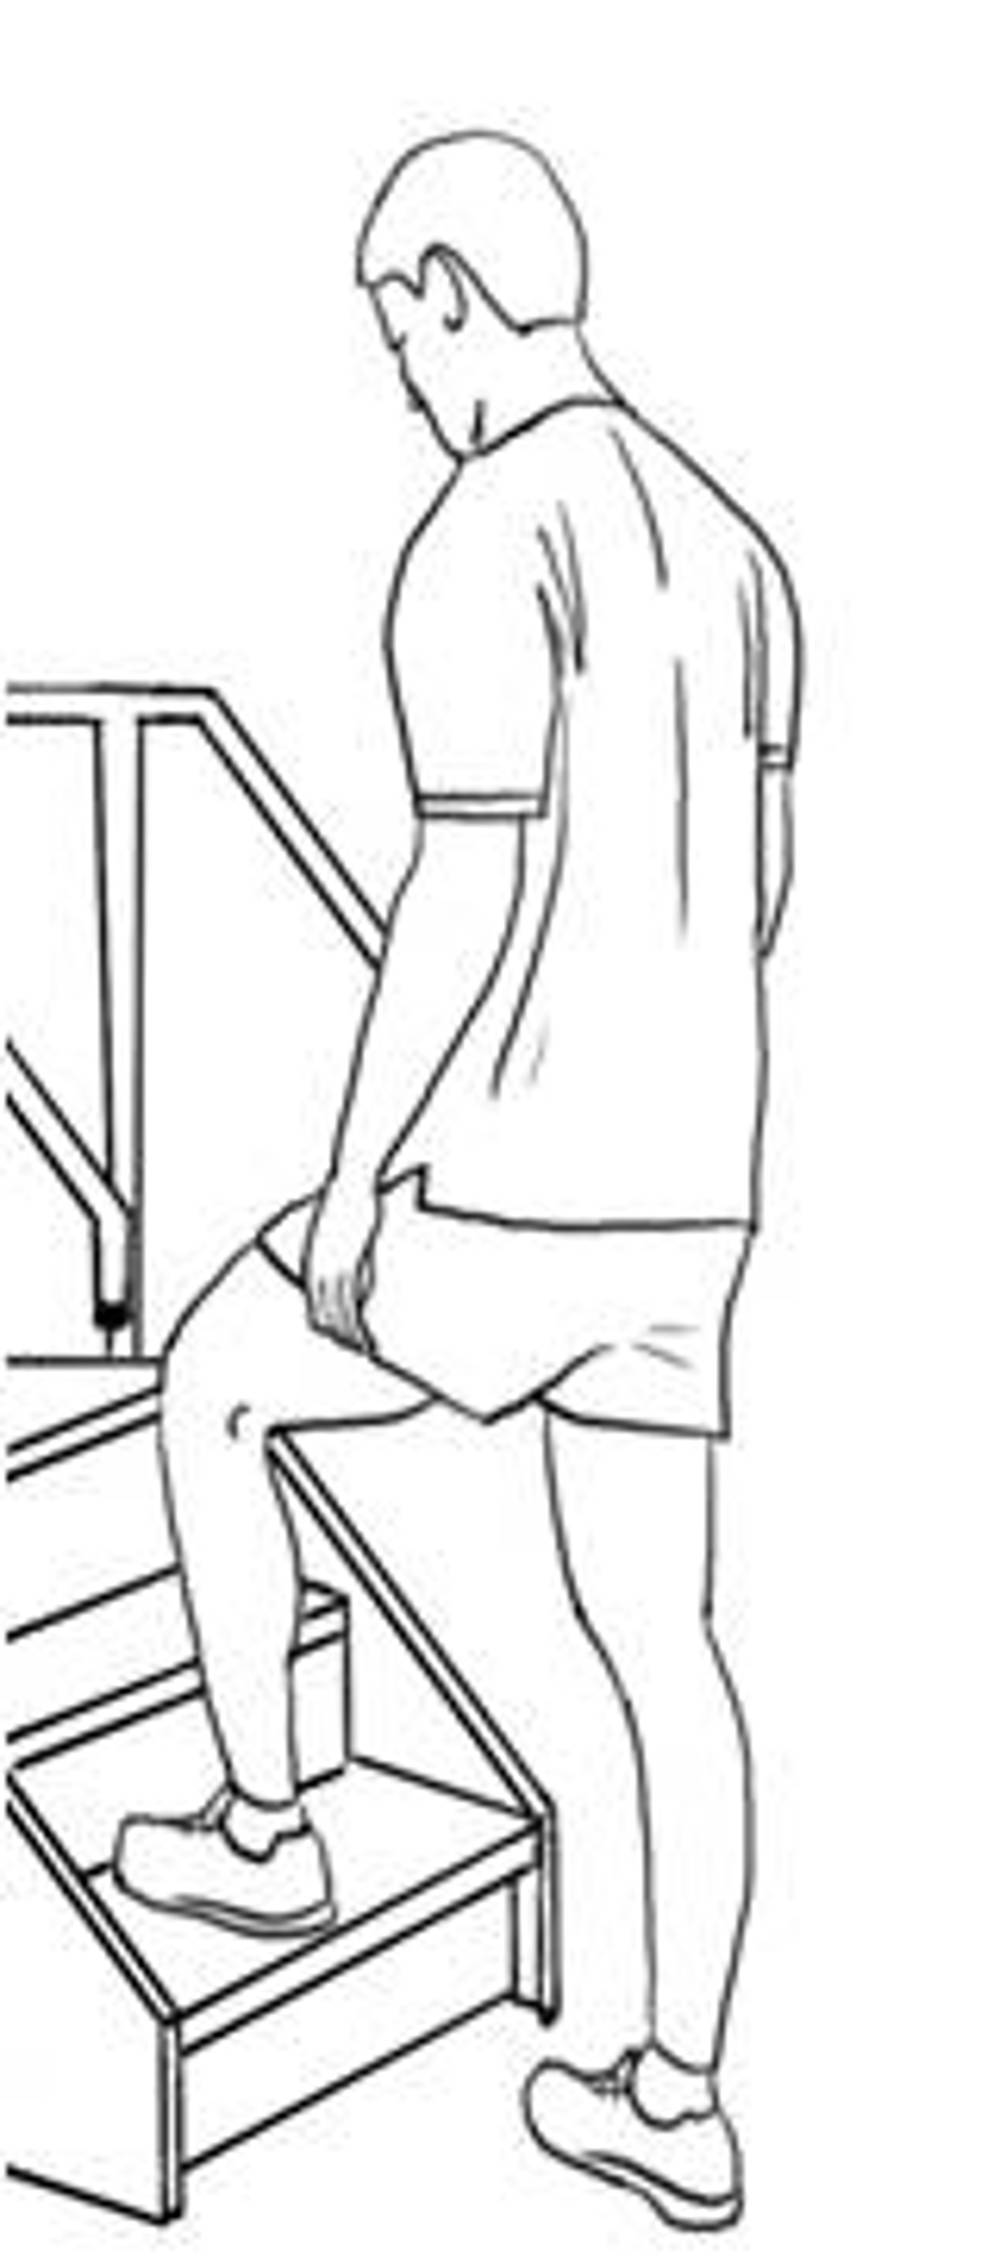
7. Step ups
Technique: Stand in front of a 20 - 40 cm step. Place the foot of the operated leg on a step. Step the other foot up to join it, and then take it back down to the floor.
Repetitions: 10 times
Sets: 3 sets at a time
Daily: Repeat 3 times daily.
Exercise progression: Increase sets or hold light weights in each hand.
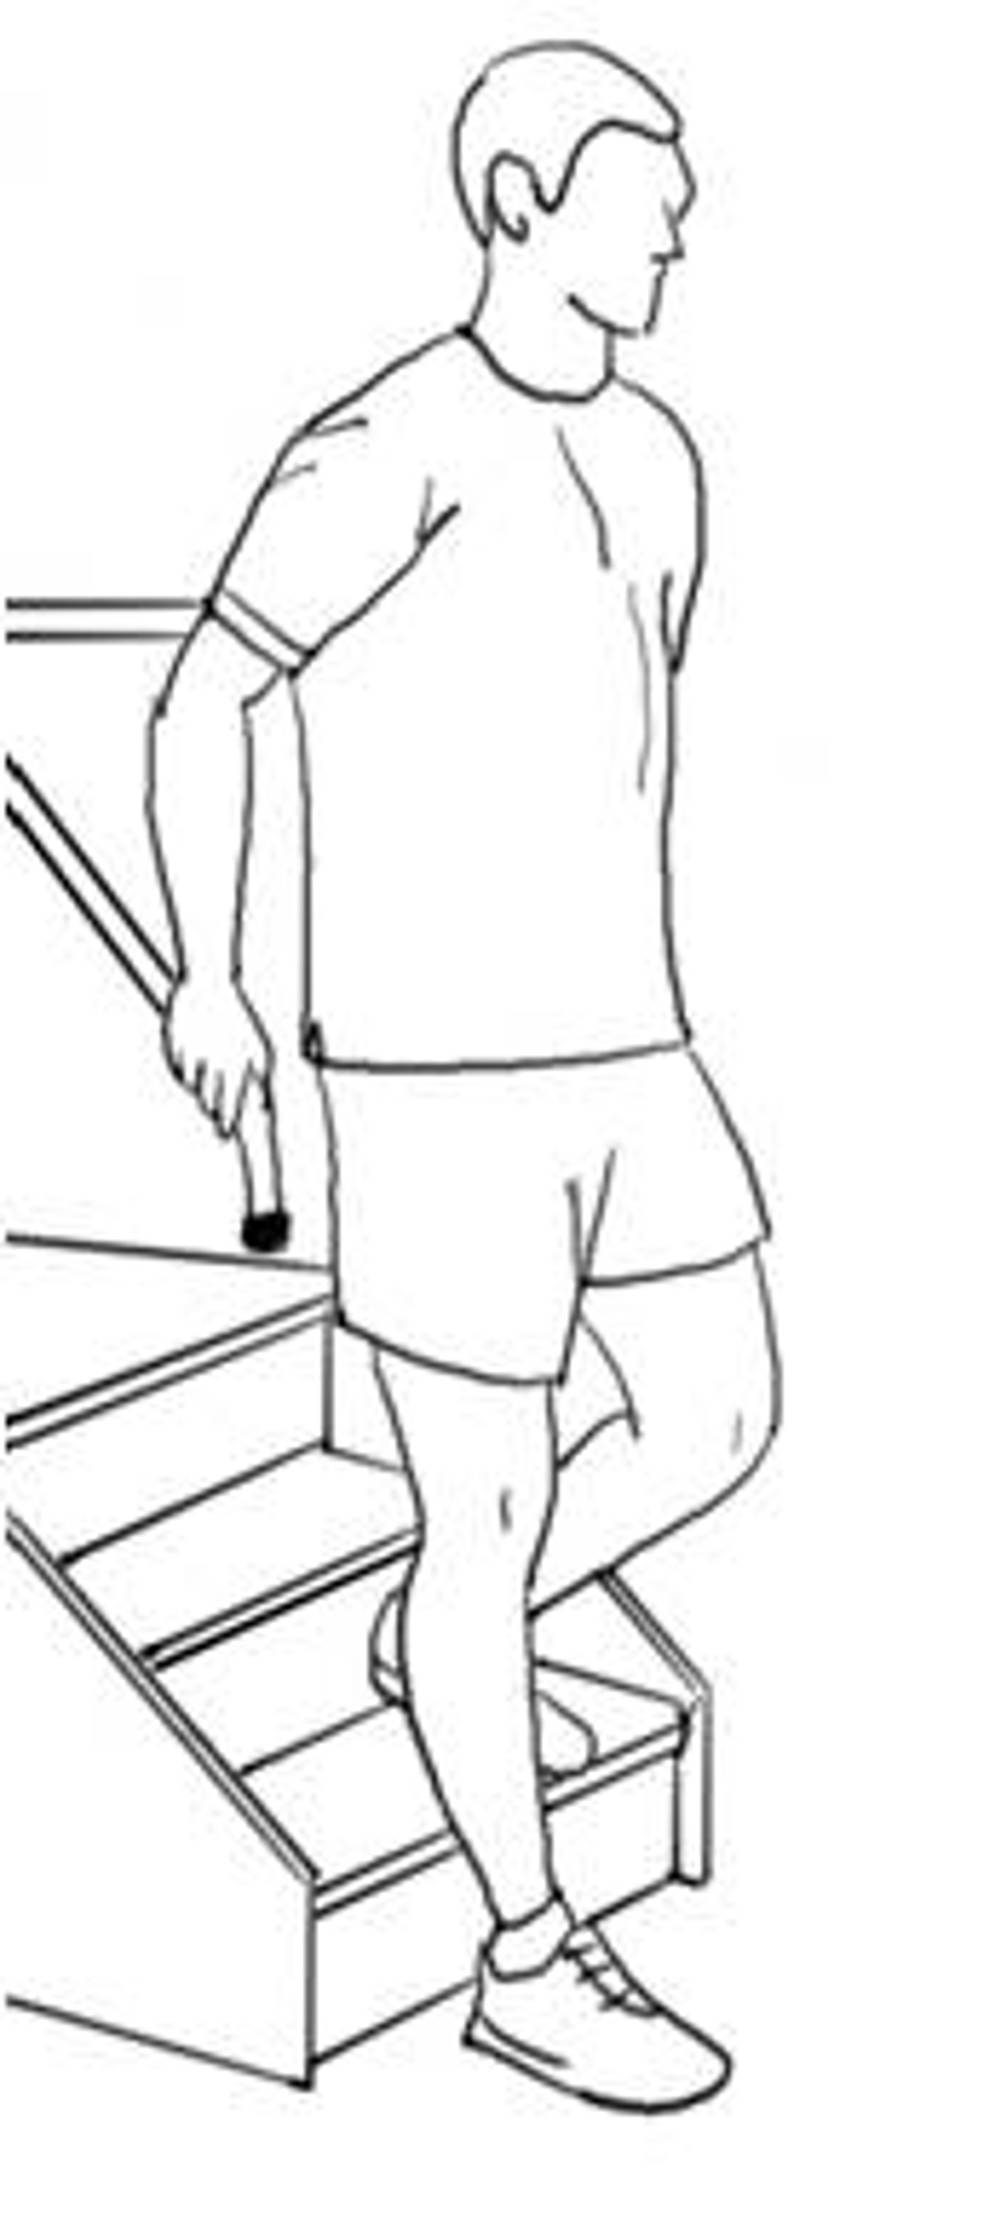
8. Step downs
Technique: Stand on the operated leg on a step facing down. Slowly lower yourself by bending your knee to approx 30° or until your other foot brushes the floor. Return to starting position. Try to stand tall throughout the movement
Repetitions: 10 times
Sets: 3 sets at a time
Daily: Repeat 3 times daily.
Exercise progression: Increase sets or hold light weights in each hand.
.
.
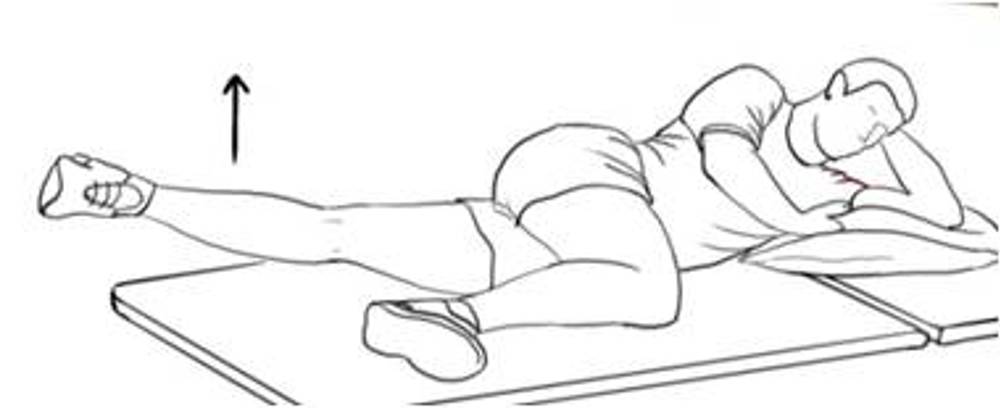
9. Hip Abduction
Technique: Lying on your operated side with top leg bent in front of lower leg and the foot on the floor. Roll top hip slightly forwards, use top arm to support you in front. Lift lower leg 20 cm from the floor keeping toes pointed forwards. Return to starting position.
Repetitions: 10 times
Sets: 3 sets at a time
Daily: Repeat 3 times daily.
Exercise progression: Add a light weight around the ankle of the leg being exercised.
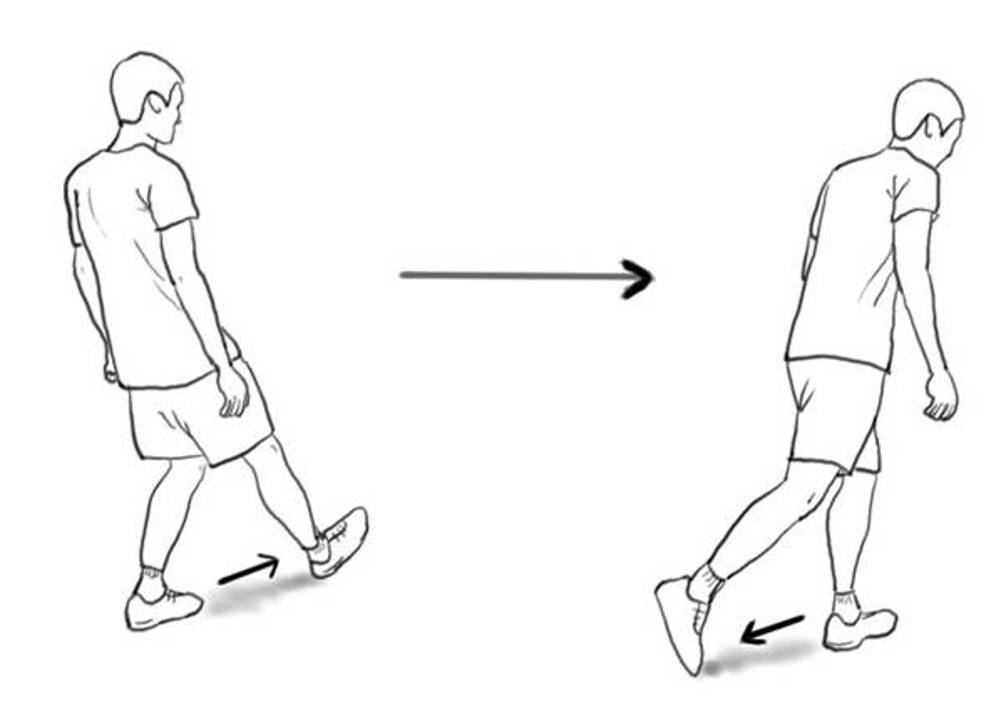
10. Lower limb balance reach
Technique: Stand on the operated leg. Reach the free foot behind you and tap the toe to the floor approx 40-50cm behind the other foot. Then return to the starting position
Then, move the free foot forward and tap the heel to the floor approximately 40 to 50cm in front of the other foot.
Return to the start position.
Repetitions: 10 times
Sets: 3 sets at a time
Daily: Repeat 3 times daily.
Exercise progression: hold light weights in each hand.
11) Cardiovascular Fitness
If you have access to a gym then using a treadmill, stationary bike, rowing machine, cross trainer and step machine are all appropriate. Avoid any equipment that involves a twisting motion of the knee.
This program is a rough guide on how you can gradually build up your cardiovascular fitness without using gym equipment. You can speed up or slow down your progress through the program as you feel appropriate.
a) Walking
5 times weekly for 20 to 30 minutes
Try to find places to walk. These should be over even ground, but with hills to vary the challenge to the legs.
Exercise progression: add a backpack with weights/books in to your back.
b) Steps
Climb and descend a set of 10 to 15 steps (stairs).
Repetitions: 10 to 20 times.
Sets: 3 sets at a time.
Weekly: 3 times a week.
Exercise progression: add a backpack with weights/books in to your back.
c) Light Jogging
Can be commenced from week 10-12 only after discussion with your physiotherapist however do not start jumping or twisting during this phase of your rehabilitation.
In a Swimming Pool:
d) Swimming
Duration: 10 to 30 minutes.
Weekly: 2 to 3 times a week.
Front or back crawl only - No Breaststroke.
Exercise progression: use a float to increase leg workout.
e) Aqua Jogging
Use either an ‘aqua jogger belt’ or other floatation device in the deep end of the pool. Your feet should not hit the bottom. Mimic the jogging motion with your legs (and arms, if not needed for floatation).
Duration: 10 to 20 minutes.
Weekly: 2 to 3 times a week.
Phase 4 Rehabilitation: Weeks 13 to 9 months
Criteria to progress onto phase 4:
- Full knee range of motion and no pain and swelling.
- Walking without any aids and able to stand on one leg without difficulty.
- No feelings of knee giving way.
Aims
- Continue to build up strength with emphasis on functional retraining.
- Progress aerobic fitness to a level appropriate to your normal function.
Guidance for return to normal activities of daily living
- If you perform a heavy manual job, consider returning to this post after 12 weeks, if agreed with your Consultant.
- You can return to light sporting activities e.g. light aerobics during this phase. However you must have good range of motion, good strength and have minimal swelling or pain to do this.
- Jogging/running is usually after 3 months post operation.
- Golf is usually after 4 months post operation.
- Jumping/hopping/cutting activities/changing direction is usually after 6 months post operation.
- Contact/Competitive sports e.g. skiing/football/rugby post operation is usually after 9 to 12 months post operation (See Phase 5)
You should get confirmation from your Consultant or Physiotherapist before returning to such activities.
Cautions
- No pivoting or twisting activities during the first
6 months after your operation.
- No contact sports during this time period.
Phase 4 – Exercises
1) Stretches
Continue stretching exercises for the calf, hamstrings and thigh (quadriceps) as in the previous Phases outlined.
See diagrams in Phases 1, 2 & 3
2) Strengthening
Continue the strengthening exercises already described in the previous Phases: See diagrams in phases 1, 2 & 3
a) Deep Squats: See pervious Phases 3
b) Single Leg Squat: See pervious Phases 3
c) Step up: See pervious Phases 3
d) Step down: See pervious Phases 3
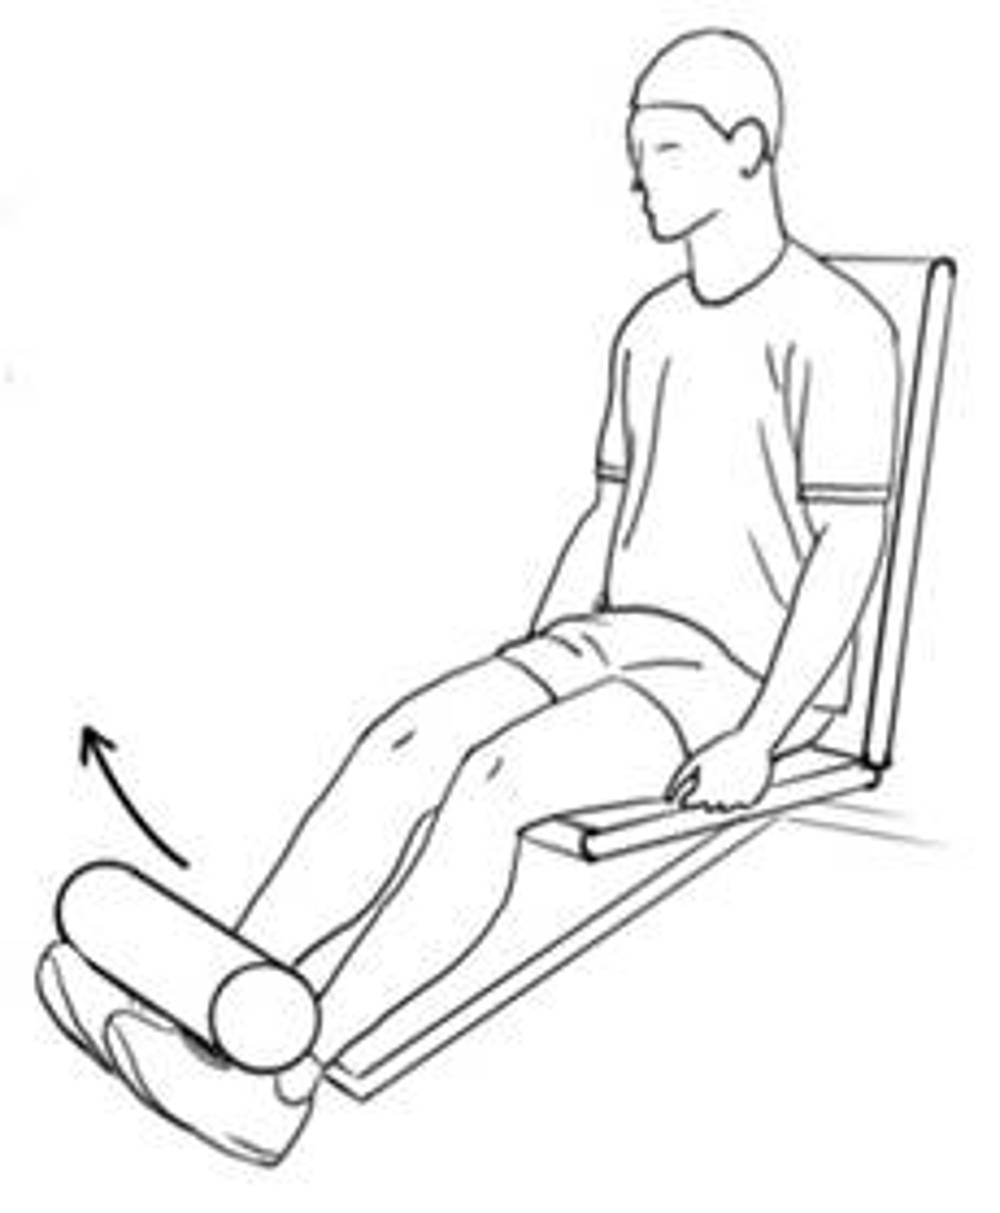
3. Quadriceps extension strengthening in the gym
Technique: In sitting, slowly straighten the knees to fully straight then bend the knees to approximately 90 degrees knee bend.
Repetitions: 10 times.
Sets: 3 sets at a time.
Weekly: Repeat 3 times weekly.
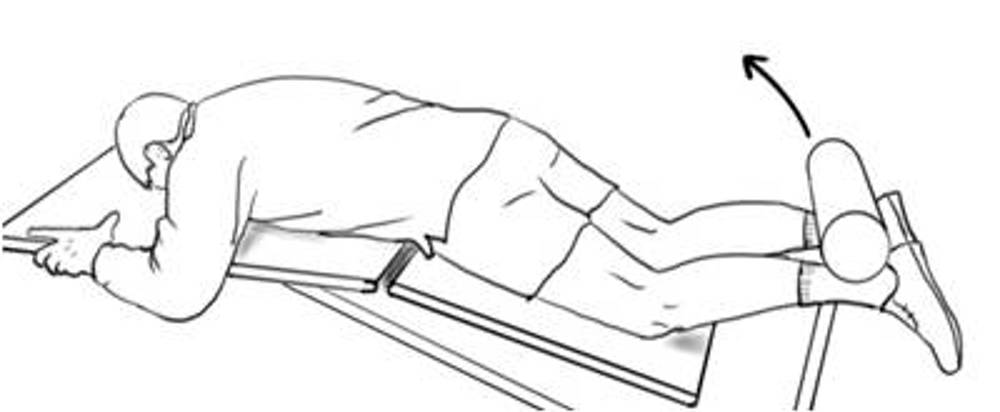
4. Hamstring curl strengthening in the gym
Technique: Lying on your front, slowly bend the knees to 90 degrees and then fully straighten.
Repetitions: 10 times.
Sets: 3 sets at a time.
Weekly: Repeat 3 times weekly.
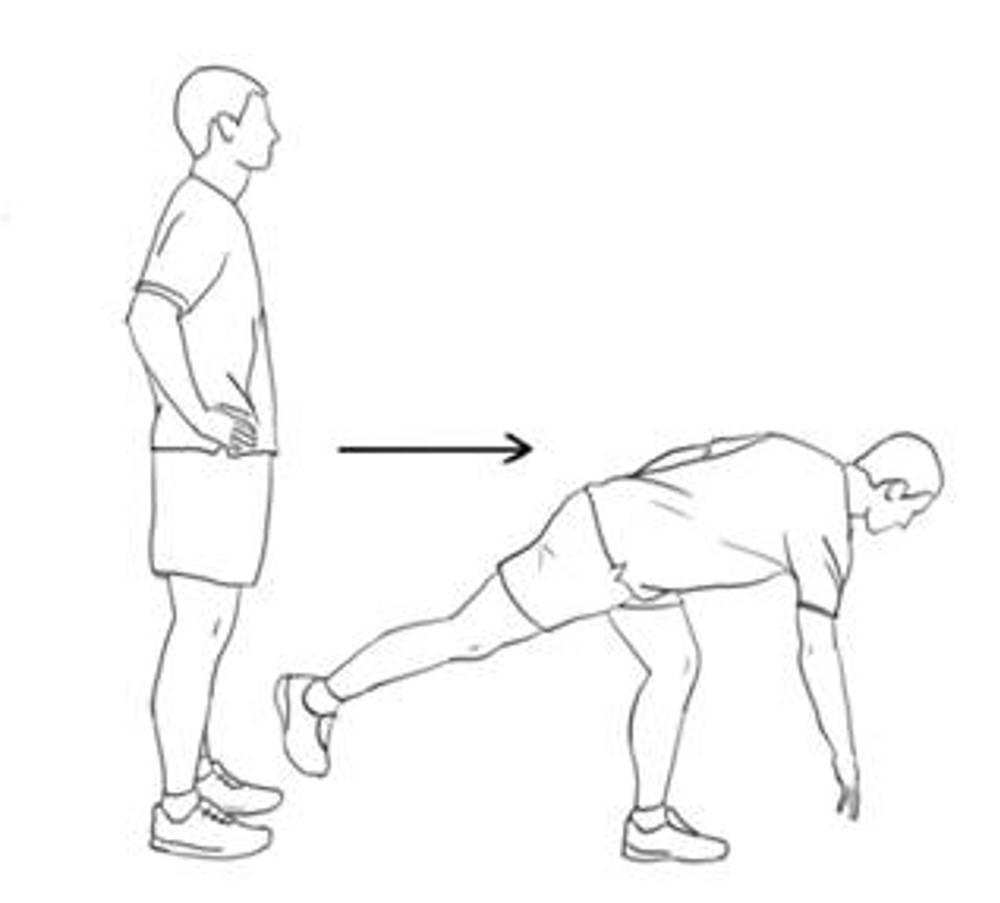
5. Single leg dead lift in the gym
Balance on your operated leg with your knee slightly bent and keep this knee angle throughout the exercise.
Bend forward at the waist and swing the non-operated leg back. Your shoulder and ankle should move as one to form a straight line.
Aim to bend as far forward as you can as if you are trying to touch the floor. Slowly return to standing.
Repetitions: 10 times.
Sets: 3 sets at a time.
Weekly: Repeat 3 times weekly.
Exercise Progression: hand weight in hand as you try to touch the floor.
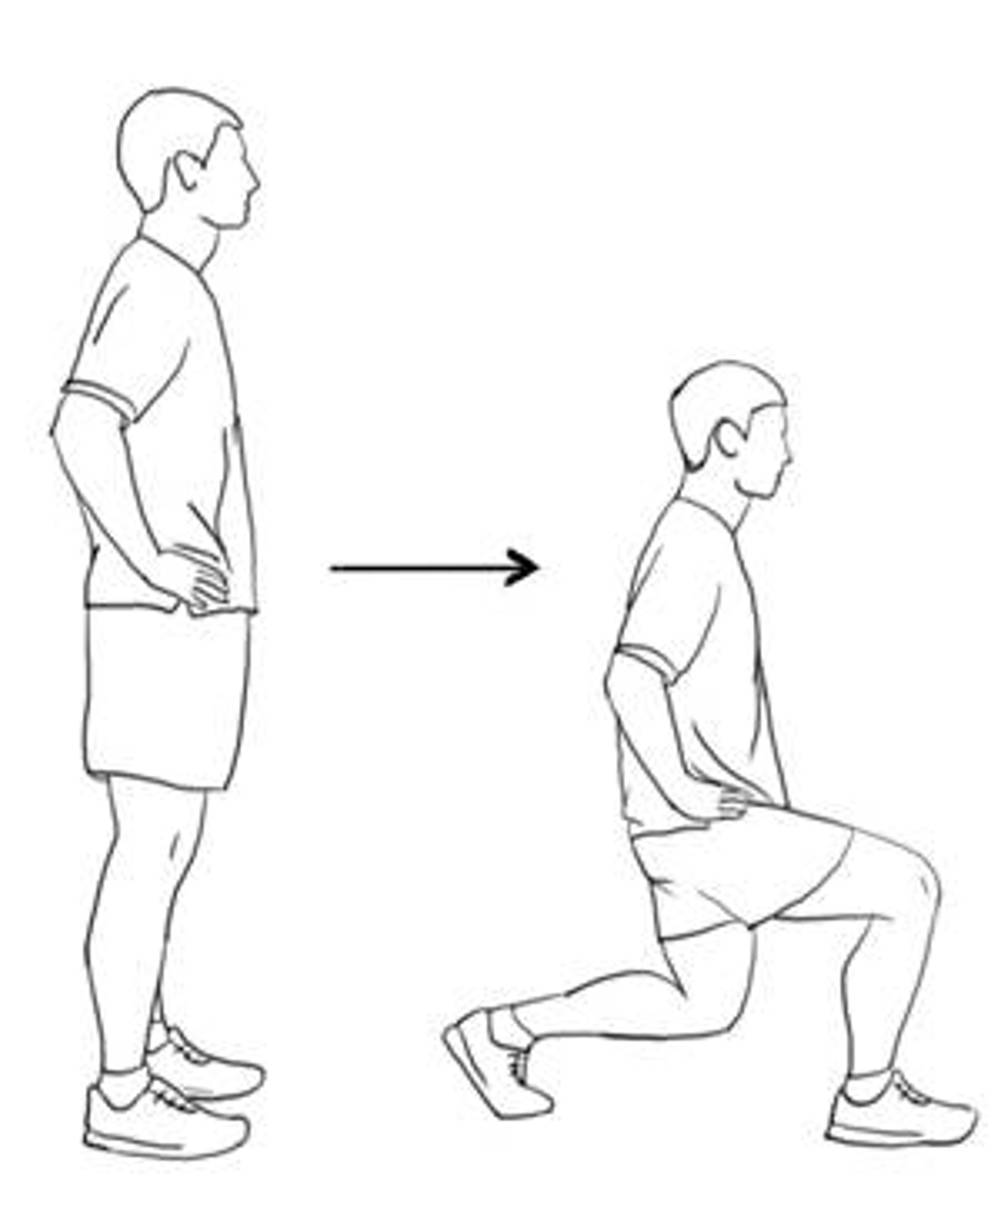
6. Forward lunges
Stand with your feet shoulder with apart. Take a large step forward with your left leg and slowly lower your right knee down towards the floor as far as you feel comfortable. Push back up into a standing position. Repeat with the right leg.
Repetitions: 10 times.
Sets: 3 sets at a time.
Weekly: Repeat 3 times weekly.
Exercise Progression: gradually increase repetitions or hand hand-weights in each hand as you carry out the exercise.
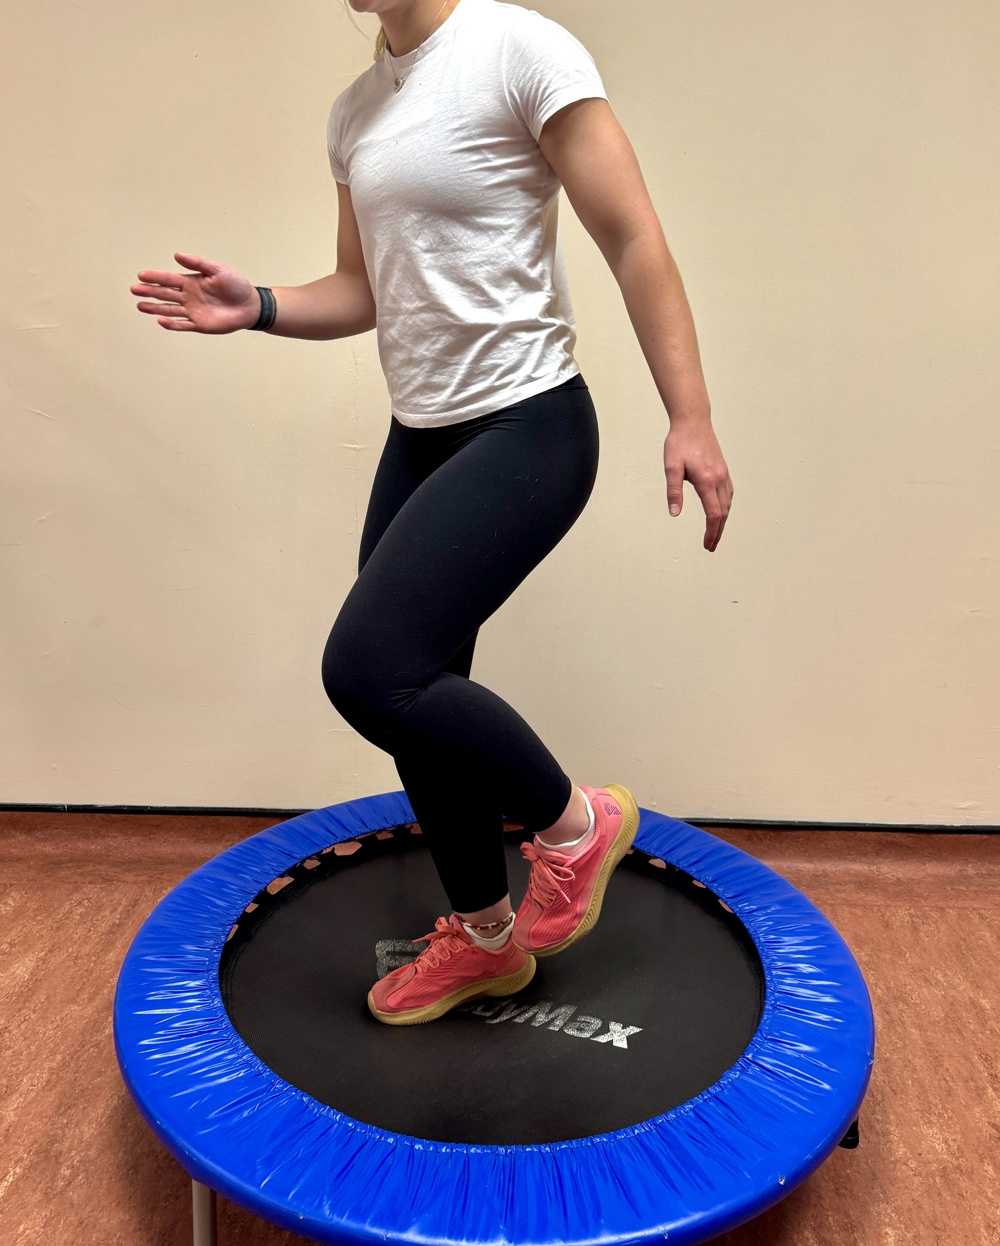
7. Mini-trampette jogging
If you have access to a trampoline, you can practice gentle jogging on the spot.
Duration: 5 minutes.
Sets: 3 sets at a time.
Weekly: Repeat 3 times weekly.
8. General Cardiovascular exercise program
Your Physiotherapist or Consultant will establish if you have adequate strength and knee control to start jogging. You can then start to slowly build up a jogging program, if your lifestyle requires it. The table below demonstrates how you can gradually build up to 30 minutes of continuous jogging.
|
Table 3: General cardiovascular (fitness) programme |
||||
|
Session |
Day |
Reps |
Walking |
Running |
|
1 |
Monday |
6 |
4 min 30 sec |
30 seconds |
|
2 |
Wednesday |
6 |
4 min |
1 min |
|
3 |
Saturday |
6 |
3 min 30 sec |
1 min 30 sec |
|
4 |
Tuesday |
6 |
3 min |
2 min |
|
5 |
Friday |
6 |
2 min 30 sec |
2 min 30 sec |
|
6 |
Monday |
6 |
2 min |
3 min |
|
7 |
Wednesday |
6 |
1 min 30 sec |
3 min 30 sec |
|
8 |
Saturday |
6 |
1 min |
4 min |
|
9 |
Tuesday |
6 |
30 sec |
4 min 30 sec |
|
10 Continuous running for 30 minutes |
||||
This program is a rough guide on how you can gradually build up your cardiovascular fitness. You can speed up or slow down your progress through the program as you feel appropriate. If running is not something you need to return to then you do not need to carry out this part of Phase 4.
Remember: Do not start a jogging program until you have been advised it is safe to do so by your Physiotherapist or Consultant.
If you are able to perform 30 minutes of running without pain, you can speak to your Physiotherapist about trying the following speed drills. Once again, if your lifestyle doesn’t require sprinting then you do not need to perform these drills.
- Sprint 20 meters, rest for a minute then repeat 5 times, (slow acceleration and slow stop).
- Sprint 20 meters, rest for a minute then repeat 5 times, (slow acceleration and fast stop).
- Sprint 20 meters, rest for a minute then repeat 5 times, (fast acceleration and fast stop).
Phase 5 - from 9 months onwards
Phase 5 Rehabilitation – from 9 months onwards
Criteria for the phase
- No pain/swelling
- Good exercise technique
- Good bilateral leg strength (your physio will carry-out tests to help determine this before you start)
Aims of this Phase
Return to Sport
Knee ligament operations help people return to their sport. Practicing jumping, hopping and turning exercises before returning can help. However these exercises have risks and benefits. Returning to sport is a common aim after knee ligament operations. About 65% of people return to their sport. This can take between one to two years following their operation. You may need more specific exercises to help you return to your sport safely. Only you can decide if you want to get back to your sport. The more demanding your sport, the more specific training you will need to do. Building up the level of exercise will help you return to your sport.
If your knee recovery is progressing well and your sport or hobby demands more dynamic activities then progress to plyometric work may be appropriate. Plyometrics are exercises in which the muscles are repeatedly and rapidly stretched ("loaded") and then contracted (e.g. as in jumping high off the ground or skipping). The aim of plyometrics is to improve muscle power, speed and agility. Please discuss the use of plyometric training with your Physiotherapist before commencing on a programme as not all individuals will require them.
When Can You Return to Sport?
The decision to return to sport can be difficult. Many people lack confidence in their operated knee at first. This takes time to come back. The physiotherapist can test the knee in the department to determine if you are ready. These tests may involve a slight increased injury risk. Injuries include damage to the new knee ligament or cartilage. The risks of injury are small. We do need to warn you about these.
The risks can be reduced by:
- Warming up properly.
- Strengthening the leg muscles.
- Improving your balance.
- Gradually doing jumping, hopping or turning exercises.
- Training for your sport before returning to competition.
Exercises in the hospital gym cannot replace sports training. You will still need to train for your sport. A coach who knows your sport can help.
Physiotherapy exercises can reduce the risk of injury. All exercise however has a degree of risk. Your physiotherapist can discuss this with you.
Guidance for return to normal activities of daily living
- Jumping/hopping/cutting activities/changing direction usually after 6 months post operation.
- Contact/Competitive sports e.g. skiing/football/rugby post operation usually after 9 to 12 months post operation
Plyometric Training
a) Programme Information
Length of time: approximately 12 weeks before progressing onto contact/competitive sport
Frequency: 48 to 72 hours (2 to 3 days) should be left between plyometric sessions, so between 2 and 4 sessions per week.
Recovery: During exercises you should wait about 5 and 10 seconds between each jump, and 2 to 3 minutes between sets of jumps. This applies to all plyometric exercises. It's important to balance volume with intensity of exercises to avoid overtraining and injury, particularly because plyometric exercises put a higher level of stress on the muscles and joints.
b) Volume
Plyometric training volume refers to the total amount of work performed during a plyometric training session or over a period of time, typically measured in terms of the number of repetitions, sets, or ground contacts (GC)* (e.g., jumps or bounds).
Beginner - no experience 80 repetitions/GC.
Intermediate - some experience 100 repetitions/GC.
Advanced - considerable experience 120 repetitions/GC.
*Ground contact (GC): Each time the foot (or feet) makes contact with the ground during a plyometric exercise, it is counted as one ground contact
c) Criteria for Plyometrics
Safety: you should be able to squat at least 1RM (section d).
Speed: you should be able to perform 5 repetitions of a squat, with 60% of your body weight in under 5 seconds.
d) 1RM
A 1RM, or one-repetition maximum, is the maximum amount of weight that a person can lift for one repetition of a given exercise. It is commonly used in strength training and conditioning to assess an individual's maximum strength for a specific lift, such as a squat, bench press, or deadlift.
The 1RM is a critical measure for several reasons:
- Strength: It provides a baseline for tracking progress and setting strength goals.
- Program Design: Helps to personalised a training program. Many training protocols use a percentage of the 1RM to determine the appropriate load for different training phases (e.g., hypertrophy, endurance, strength, plyometrics).
- Safety and Efficiency: Ensures that the weight used in training is both safe and effective for the individual.
Estimating 1RM
- Warm up with lighter weights.
- Gradually increase the weight while performing single repetitions until you reach the maximum weight you can lift once with proper form.
Strength Ratio before starting plyometrics
- The operated side should be at least 90% strength of the non-operated side
- Overall strength should be x1.5-2 x your body weight
Plyometric warm up drills
1) Marching
Mimics running movements: emphasises posture and movement technique; enhances correct lower body movements for running.
2) Jogging
Prepares for high impact and high intensity plyometric drills; include jogging on the toes only – emphasises quick reaction.
3) Skipping
Exaggerated form of upper and lower limb movements with the emphasis on quick take off and landing.
4) Footwork
Drills that target change of direction, like shuttles, figure 8 movements and striding drills.
5) Walking lunge drills
Lunging along the length of your hall or in a straight line outside, alternating between left and right side lunges.
Lower Body Plyometric Drills
Equipment: you may benefit from access to an agility ladder and/or plyometric box for some of these exercises.
1) Jumps in place
Jumps in place emphasise the vertical component of jumping and are performed repeatedly without rest between jumps.
2) Standing jumps
These emphasise either horizontal or vertical components. These are maximal efforts with recovery between jumps.
3) Multiple hops/jumps
Involve repeated movement and may be viewed as a combination of jumps in place and standing jumps. An example of this is a zigzag hop.
4) Bounds
Bounding drills involve exaggerated movements with greater horizontal speed than other drills. Volume for bounds is usually measured by distance but can be measured in the number of hops performed.
5) Box drills
These drills increase the intensity of multiple hops or jumps by using a box. The box may be jumped on or off. The height of the box depends on the person jumping.
6) Depth drills
The athlete jumps from one box and immediately upon landing, jumps onto another box.
For long term benefit from your surgery you need to continue to maintain the mobility, strength, balance, coordination and general fitness at your knee.
Worries or concerns
For non-urgent issues or concerns
For non-urgent issues or concerns please contact your Physiotherapist or Consultant’s Secretary through the NHS Fife Hospital Switchboard 01592 643355.
For urgent issues or concerns
If you have any urgent concerns regarding your condition, please contact the Physiotherapy Service on 01592 647199.
Urgent advice for patients between 8am to 8pm Monday to Sunday, contact the National Treatment Centre - Fife Orthopaedics on 01592 643355 Extension 22685.
Urgent out of the hours advice
For an urgent problem out of hours, please contact NHS 24 on 111 or attend Accident and Emergency.
Emergency advice
For emergency advice, attend Accident and Emergency or call 999.
Accessible formats
If you require this information in a community language or alternative format such as Braille, audio, large print, BSL, or Easy Read, please contact the Equality and Human Rights Team at: email: fife.EqualityandHumanRights@nhs.scot or phone 01592 729130. For people with a hearing or verbal impairment you can also contact the team through the NHS Fife SMS text service number on 07805800005.


